Module #2
- Boolean Data
- Conditional Statements
- Short-Circuit Evaluation
- Basic Python Modules
- while_loops
- while_loop_control
- Color in Turtle Graphics
- Color in Turtle Graphics Part 2
- Quiz
In this module you will learn how we can design programs that let Python ask 'questions' - in essence, this lets us write programs that have the ability to make decisions based on certain conditions. To do that we'll need to understand the concepts of boolean logic and a decision structure known as an if statement and its related statements. In addition we'll introduce you to some basic Python Modules that add additional functionality to make our programs more interesting. Lastly, we'll go through the basics of working with 'repetition structures' in Python.
Boolean Data
So far we have discussed three different "data types" in Python - 'strings' for sequences of characters, 'integers' for whole numbers and 'floats' for numbers that contain a decimal point. The video below will introduce you to a fourth data type called the 'Boolean' data type. This data type is used to store 'logical' values - that is, values that can be one either True or False. We use logical values all the time in our program to determine if a particular condition exists (i.e. did the user type their username into a form correctly? The answer to that question is either True or False).
In addition to the 'string', 'int', and 'float' data types you've already learned about, there is another data type called the Booleans data type (bool for short). A Boolean is a value of either True or False.
True is not the same as true.Recall that all expressions in Python evaluate to a value that has a data type. For example, the addition problem in the following expression evaluates to an 'integer' because both of the operands are 'integers':
print (5 + 7)
A Boolean expression is an expression that evaluates to a value that has a data type of Boolean (i.e. True or False). We can write Boolean expressions using comparision operators which allow us to compare two values.
There are six comparision operators that we use in Python - the table below gives examples of how each of the comparision operators can be used:
x == y     # EQUALITY:                 is x equal to y?
x != y     # INEQUALITY:               is x not equal to y?
x > y      # GREATER THAN:             is x greater than y?
x >= y     # GREATER THAN OR EQUAL TO: is x greater than or equal to y?
x < y      # LESS THAN:                is x less than y?
x <= y     # LESS THAN OR EQUAL TO:    is x less than or equal to y?
Any expression that uses a comparision operator evaluates to a Boolean value. For example, 5 > 3 asks a question - "is 5 greater than 3?" - the answer here is "Yes", so the expression evaluates to the Boolean value of True
= symbol is the assignment operator used to assign values to variables, while == is a comparison operator used to check for equality. The two are not interchangeable.. Also note that there is no =<, =>, or =! operators, the non-equals symbols (!, <, and >) always come first when writing a comparision operator.Logical Operators
A logical operator is an operator that lets you combine multiple boolean expressions. There are three logical operators: and, or, and not.
For example, assume you have a variable called 'x' that is holding the value 5:
x = 5
If we wanted to test to see if the value being held in the variable 'x' is between 3 and 7 we would need to test two different conditions:
is x >= 3?
is x <= 7?
However, each one of these expressions only tests one condition - the first one determines if x is greater than 3, and the second one determines if x is less than 7. We actually need the answer to both of these questions to be True to determine if a number is between 3 and 7. We can do this using the and logical operator, like this:
x > 3 and x < 7
Python first evaluates each of the Boolean expressions independently. Next, it sees the "and" logical operator between them - this "connects" the two expressions and says "if the first expression evaluates to True AND the second expression evaluates to True then the whole expression evaluates to True"
The semantics (the meaning of) the logical operators in Python are the same as they are in a natural language (a spoken language). Here are a few tables that show how these operators work:
"and" operator# the "and" operator is the most restrictive logical operator # it will evaluate to True only if all of its operands also evaluate to True Operand 1 Operand 2 Result True and True True True and False False False and True False False and False False"or" operator
# the "or" operator is less restrictive than the "and" operator
# it will evaluate to True if any one of its operands evaluete to True

Operand 1			Operand 2	Result
True		or		True		True
True		or		False		True
False		or		True		True
False		or		False		False
"not" operator
# the "not" operator negates a Boolean expression
# it "flips" True's to False's and False's to True's

Operand 1	Result
not True	False
not False	True
Here are some examples:
x < 0 or x > 10     # True if x is less than 0 *or* x is greater than 10;
                    # otherwise False
x > 0 and x < 100   # True if x is greater than 0 *and* x is less than 10;
                    # otherwise False
not x < 0           # True if x is *not* less than 0; otherwise False
Order of operations
When we see an expression that has multiple operators (any combination of mathematical, comparison, or logical operators) we need to know what order to perform those operations. The order is determined by predefined precedence given by the following table which is ordered from the highest precedence (done first) to the lowest precedence (done last):
| Order of Operations | Operator(s) | Operator Type |
|---|---|---|
| Done 1st | ( ) | specify order of operations |
| 2nd | ** | exponentiation |
| 3rd | *, /, //, % | multiplicative |
| 4th | +, - | addition |
| 5th | ==, !=, <=, >=, <, > | comparison |
| 6th | not | logical |
| 7th | and | logical |
| Done last | or | logical |
Given this order of operations notice the equivalence relationship between the following statements:
# Following two lines are equivalent:
x-1 >= 2 and y*3 <= 4
((x-1) >= 2) and ((y*3) <= 4)

# Following three lines are equivalent:
x == 1 and not y == 2
(x == 1) and not (y == 2)
(x == 1) and (not (y == 2))
Conditional Statements
Conditional statements (also known as "selection statements" or "if statements") are statements that execute different lines of code based on a Boolean condition. These kinds of statements allow us to have our programs "ask questions" and make their own decisions while the program is running.
One-way "if" Statements
Conditional statements are written in Python using the if keyword followed by a Boolean expression and a colon. An if statement will execute the statements inside of its body given a certain condition is True. Let's begin with a simple "one-way 'if' statement" example:
if statement below will only execute if the Boolean condition attached to the if statement evaluates to True. Click the "Run" button to see the program in action or download a copy.
In this example we are evaluating a condition using an if statement. This tells Python to compute the result of a Boolean expression - if the result is True then the code that is indented under the if statment will be executed. Note the 'colon' character at the end of the line that contains the if statement - this is required by Python and will generate a syntax error if it is omitted. Note that the print statement that is not indented under the if statement will always execute since it is not part of the "block" of code indented under the if statement.
There can be multiple statements inside a code block and these statements are executed in sequential order (one after another).
if statements.Two-way "if" statements
If the condition attached to an if statements evalutes to True then the code block indented under that if statement is executed. However, there are times when we want to run a different block of code if the result of the Boolean expression is False We can do this by using the optional else statement.
The else statement is positioned after the if statement at the same level of indentation. If the Boolean condition associated with the if statement evaluates to True then Python will execute the code indented under the if statement and skip the else statement. However, if the condition evalutes to False then Python will skip the if statement and execute the else statement instead. Here's an example:
if statement below will only execute if the Boolean condition attached to the if statement evaluates to True. If the Boolean condition evalutes to False, however, then Python will skip that block and instead execute the block associated with the else statement. Click the "Run" button to see the program in action or download a copy.
Multi-Way "if" Statements
There are times when a two-way if statement won't work because the quesiton you are asking has more than two possible answers. We can do this in Python by using a "multi-way 'if' statement" which is implemented using the optional elif keyword. In essence, this keyword lets us ask "follow-up" questions after we ask the intial question using an if statement. Here's an example:
if statement below will only execute if the Boolean condition attached to the if statement evaluates to True. If the Boolean condition evalutes to False Python will ask a "follow-up" question using the elif statmement. An conditional statement can have any number of elif statements in it. If any of the elif statements evaluate to True then Python will execute the statements associated with that item and skip the rest. If Python finds that no Boolean expressions evaluate to True within a "multi-way 'if' statement" then it will execute the code associated with the else block. Note that elif and else are optional statements and are not required (but they are incredibly helpful when used appropriately!). Click the "Run" button to see the program in action or download a copy.
Nested "if" Statements
Sometimes you will want to ask additional questions inside of the body of another if statement. We can do this by "nesting" an if statement inside of another if statement. Here's are a few examples of this process:
if statements. The "outer" statement determines if the number is postive or not. If it's positive then we ask a "follow-up" question by writing a new if statement inside of the outer statement. Click the "Run" button to see the program in action or download a copy.
if statements to convert a numeric grade into a letter grade. Click the "Run" button to see the program in action or download a copy.
if blocks
by seeing which if statements line up vertically with which else statements.Programming Challenges
As mentioned in the video above, if statements are fundamental to computer programming - you will most likely need to use them in every program you write for the rest of the semester. Take a moment to test your understanding of if statements by attempting to solve the following challenges.
Enter a coin value: 1
That's a penny!
... and here's another running:
Enter a coin value: 25
That's a quarter!
... and a third running:
Enter a coin value: 99
That's not a valid coin!
Click the "Run" button to check your work, and click here to download the solution.
Programming Challenge: Write a program that asks the user for a number between 1 and 5 (inclusive). Then report to the user the following:
- If the number is even
- If the nubmer is odd
- If the number is prime
- If the number is not prime
Ensure that the user enters a number betwen 1 and 5 (you can print an error message if they supply an invalid number). Click the "Run" button to check your work, and click here to download the solution.
Programming Challenge: Write a program that asks the user for the price of an item they are purchasing. Items are eligible for a discount based on their price as follows:
- $10 or less: no discount
- Between $10 and $50: 10% discount
- Over $50: 20% discount
Ensure that you don't allow the user to enter negative values or zero as a price value. Click the "Run" button to check your work, and click here to download the solution.
Short-Circuit Evaluation
When we have a Boolean expression that uses and or or, most
programmming languages iwill use what is called short-circuit evaluation to evaluate the expression in the most efficient way possible.
In programming, certain Boolean expressions can be fully evaluated without having to execute every single part of the statement. For example, consider the following example:
A > B or C > D
If Python executes this statement it will begin by computing A > B, which can be either True or False. Remember that the or operator will yield a True result if either statement it connects evaluates to True. So if A > B evaluates to True then there is really no need to move on and evaluate C > D - so Python skips it and moves on!
Likewise, consider the following statement:
A > B and C > D
Python will begin to evaluate this expression just in the previous example, but in this case we are connecting the two sub-expressions with the and operator. If the first expression evaluates to False then there is really no need to continue - there's no way the expression can evaluate to True since the and operator will only yield a True result if both Boolean expressions evaluate to True.
Basic Python Modules
The Python programming language contains a core set of functions that you can freely use in your programs, such as print format and input. However, there are times when you will want to access more "specialized" functions that are not part of the core Python package. For example, let's say you are writing a video game that needs to compute the angle between two characters on the screen. To do this you would probably need access to some basic trigonometry functions such as sin, cos and tan - but these functions are not built into Python. Thankfully Python supports the ability to import specialized function libraries, know as "modules", into your programs. These modules give you access to functions that are not normally available to you in Python.
Importing and Using Modules
To use a module we first have to import them into our own programs. Importing a module tells Python that we're going to need to access that module and all of the functions that it contains. In order to import a module into your program you first need to issue the import command - this command tells Python to load the module into memory and make available all of the functions in that module. Note that this command should happen at the very beginning of your program - the first few lines of your code should contain all of your "import" statements. Here's an example that imports the "math" module into a program:
# ask Python to give us access to all of the functions in the "math" module
import math
Next, we will probably want to use the functions that exist within our newly imported module. We can do this using the period character (.) along with the name of the module to tell Python to run a function that exists within tha tmodule. We call this "dot syntax" - here's an example:
# ask Python to give us access to all of the functions in the "math" module
import math

# now run the "sin" function inside of the "math" module
# note how we have to first tell Python to look inside of the "math" module
# then we use the "dot" character followed by the name of the function we want to access
x = math.sin(3.14159)
How do you know what functions are available inside of a module? One great way to explore the functions inside of a module is to refer to Python's online documentation website which is abailable at http://docs.python.org/3/. This page contains everything you need to know about how Python works, but if you're interested in learning more about a specific module you can click on the Global Module Index link and then scroll down to the module you are interested in. If you look at the documentation for the Math Module, you'll notice that it provides a lot of mathematical functions and constants, including:
math.sin: computes the sine of a floating point number (returns a float)math.radians: converts degrees to radians (returns a float)math.pi: the constant PI computed to 15 decimal places
If you're using IDLE in "Interactive" mode you can also access the documentation straight from there by running the following command:
help("modules")     # gets a list of available modules on your system
help("math")        # gets the documentation for the Math module
The Math Module
The math module contains a number of math-related functions and "constants" (read-only variables that you often need to use, such as the number Pi). Here are a few examples:
if statements to convert a numeric grade into a letter grade. Click the "Run" button to see the program in action or download a copy.
The Random Module
Random numbers are often used in computer programs to give your programs the ability to make their own decisions. For example, let's say you were writing a program to play a game of Rock-Paper-Scissors with the user. We could easily ask the user which symbol they wanted to play using the input function, but how can the computer pick its symbol? One answer would be to have the computer pick a random number between 1 and 3. If the computer picks 1, then we can say that it picked 'Rock' - if it picked 2, 'Paper' - and if it picked 3, 'Scissors'. By ascribing meaning to these numbers we can give our programs the illusion of being able to "think" for themselves!
Here are some common examples of how we could use random numbers in a Python program:
- To play a game of chance where the computer needs to throw some dice, pick a number, or flip a coin
- To shuffle a deck of playing cards
- To randomly place a new enemy character in a game
- To simulate possible rainfall amounts in a computerized model for estimating the environmental impact of building a dam
- For encrypting your banking session on the Internet
Python provides a Random module that helps with tasks like this. You can take a look at it in the documentation.
The easiest way to generate a random number is to use the random.randint function. This function requires two argumenst - a low bound and a high bound. It then returns a random integer within this range (inclusive of the end points) - here's an example:
import random

# get a random number between 1 and 3
# it could be 1, 2 or 3 - the function will decide when it runs
num = random.randint(1,3)
Here are a few sample programs that use the random.randint function:
If you need to generate a random floating point number you can use the random.random function. This function returns a floating point number in the range [0.0, 1.0) — the square bracket means "closed interval on the left" and the round parenthesis means "open interval on the right". In other words, 0.0 is a possibility, but all returned numbers will be strictly less than 1.0 (i.e. 1.0 will never occur). It is usual to scale the results after calling this method, to get them into a range suitable for your application (i.e. multiplying this number by 10 will generate a random between 0.0 and 10.0).
It is important to note that the Python random number generator is based on a deterministic algorithm which means that it is both repeatable and predictable. This is why we call this method of generating random number "pseudo-random" generator — the numbers that are generated are not really random at all - they are actually based off of a "seed" value which is usually determined by your computer's built in clock. Each time you ask for another random number, you’ll get one based on the current seed (the system clock), and the state of the seed (which is one of the attributes of the generator) will be updated. The good news is that each time you run your program, the seed value is likely to be different meaning that even though the random numbers are being created algorithmically, you will likely get random behavior each time you execute.
Programming Challenge: Write a program that generates a random die roll on a six sided die. Click the "Run" button to check your work, and click here to download the solution.
Programming Challenge: Extend the previous program to generate two die rolls. Imagine that these two values are being used to play a virtual game of "Craps" - in this game each die combination has a unique name as can be seen in the following chart (the top row shows the value that was rolled for the first die and the left-most column shows the value that was rolled for the second die):
| 1 | 2 | 3 | 4 | 5 | 6 | |
|---|---|---|---|---|---|---|
| 1 | Snake Eyes | Ace Deuce | Easy Four | Five (Fever Five) | Easy Six | Natural or Seven Out |
| 2 | Ace Deuce | Hard Four | Five (Fever Five) | Easy Six | Natural or Seven Out | Easy Eight |
| 3 | Easy Four | Five (Fever Five) | Hard Six | Natural or Seven Out | Easy Eight | Nine (Nina) |
| 4 | Five (Fever Five) | Easy Six | Natural or Seven Out | Hard Eight | Nine (Nina) | Easy Ten |
| 5 | Easy Six | Natural or Seven Out | Easy Eight | Nine (Nina) | Hard Ten | Yo (Yo-leven) |
| 6 | Natural or Seven Out | Easy Eight | Nine (Nina) | Easy Ten | Yo (Yo-leven) | Boxcars |
Your program should generate two die values, display the output along with the name of the roll. Hint: there are many repeating names in the table above! Use this information to your advantage!
For the purpose of this program you can generate two numbers between 1 and 3 (otherwise you would be typing all day!) - feel free to try and implement two six sided die rolls if you have the time though.
Click the "Run" button to check your work, and click here to download the solution.
Alternate Import Option
The preferred method of importing a module into your program is to use the import command at the top of your program - you can then use "dot syntax" along with the name of your module to access functions organized within that module. However, there is another way to access modules which is sometimes used - this way is generally frowned upon as it clutters your programs namespace (what functions and data are defined in the current environment), but you should be aware of it as you may see it used elsewhere.
Instead of importing the module, you can import specific items into your
programs namespace.
The syntax is one of the following:
from MODULE_NAME import ITEM_NAME
from MODULE_NAME import ITEM_NAME,ITEM_NAME,...
from MODULE_NAME import *
This last option uses what we call a wildcard. A wildcard is a character that means it can match anything, on most systems that character is the asterisk (*). If you use the wildcard you're importing all the items from the entire module.
Here are some examples:
# import all of the functions from the "random" module
from random import *

# call the "randint" function - note how we don't need to call it using
# the module name (i.e. random.randint(1,10) can be written as randint(1,10)
print(randint(1,10))
# import just two functions from the "math" module
from math import pow,sqrt

# now we can call these functions without prefacing them with the "math." prefix
print(pow(2,16))
print(sqrt(16))
Repetition Structures and "while" Loops
When writing a program you will find that you will often need to repeat certain statements over and over again. For example, say you wanted to write a program to compute the tip on a restaurnt bill. You could easily do this for one person by doing the following:
# get bill amount
bill = float(input("Enter bill amount: "))
rate = float(input("Enter tip rate (i.e. 0.15): "))

# calculate tip
print ("Your tip: ", bill * rate)
However, let's say that you wanted to compute the tip amount for 3 different restaurant bills. As of right now the only way you could do this would be to copy the program you just wrote and paste it three times:
# get bill amount (#1)
bill = float(input("Enter bill amount: "))
rate = float(input("Enter tip rate (i.e. 0.15): "))

# calculate tip (#1)
print ("Your tip: ", bill * rate)


# get bill amount (#2)
bill = float(input("Enter bill amount: "))
rate = float(input("Enter tip rate (i.e. 0.15): "))

# calculate tip (#2)
print ("Your tip: ", bill * rate)


# get bill amount (#3)
bill = float(input("Enter bill amount: "))
rate = float(input("Enter tip rate (i.e. 0.15): "))

# calculate tip (#3)
print ("Your tip: ", bill * rate)
There are some major disadvantages to this approach. For example - what if you were asked to compute the tip for 1,000 restaurant checks? You would by copying and pasting your code all day long! And if you inadvertently made a mistake in your original program before you copied and pasted your code you would have to fix your program in multiple places. This would become an incredibly time consuming task!
One solution to this kind of problem is to take advantage of a programming technique called a "repetition structure". This involves writing your code one time and then placing it into a special statement that causes Python to repeat it as many times as necessary. Programmers usually refer to this as a "loop".
There are a few different kinds of loops in Python. This module discusses the while loop which is known as a “condition controlled loop” -- this means that the looping behavior of the structure is dependent on the evaluation of a condition (i.e. a Boolean expression). The syntax for a condition controlled loop is almost identical to the if statement that we covered in the previous module. For example:
while condition:
   print ("this will continue to print over and over again")
   print ("... as long as the condition above evaluates to True")
In Python, a while loop works as follows:
- Evaluate a Boolean expression
- If it is False, skip the block of statements associated with the while loop
- If it is True
- Execute the block of statements associated with the while loop
- Go back to step 1
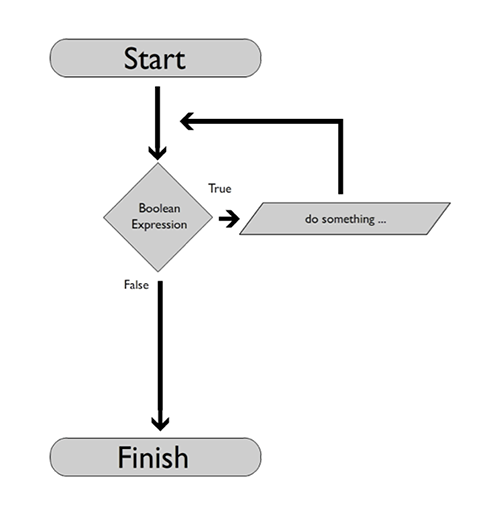
Here's what this looks like as a flowchart - note that the structure is almost identical to an if statement, but with a while loop we re-evaluate the condition being tested until it eventually evaluates to False.
The trick with while loops is to control the condition that is being evaluated. One way to do this is to create a variable which can be used in a boolean expression to determine if a loop needs to iterate again.
Here is the "tip calculator" program written using a while loop:
# set up our loop!
# first, we must make an assumption.  our assumption is that we want to
# compute the tip on a restaurant bill.  we can express this assumption
# by creating a variable that is holding a specific value (in this case
# the value is the String "yes")
# this variable is sometimes referred to as a "control variable"
compute_tips = 'yes'

# next we can ask Python to start a loop. this loop will execute as long
# as our "compute_tips" varialbe is holding the value "yes"
# note that the first time we encounter this loop the value of "compute_tips"
# will be "yes" because we set up this variable on the previous line
while compute_tips == 'yes':

	# get bill amount
	bill = float(input("Enter bill amount: "))
	rate = float(input("Enter tip rate (i.e. 0.15): "))

	# calculate tip
	print ("Your tip: ", bill * rate)

	# ask the user if they want to continue
	compute_tips = input('Do you want to continue? Type yes or no ')

	# note that we are overwriting the "compute_tips" variable on the previous line
	# once we reach the end of the loop Python will jump back up to the beginning of
	# the "while" loop and re-evaluate the condition.  if the user typed the word
	# "yes" then the condition evalutes to True (compute_tips == 'yes') -- but if they
	# type "no" (or anything else) the condition will evaluate to False and the loop
	# will not execute again.

print ("thanks for using our program")
We refer to the process of going through a loop as an “iteration,” so if a loop cycles through 5 times then we say we have “iterated” through it 5 times
The while loop is considered a “pre-test” loop, meaning that it only iterates upon the successful evaluation of a condition. This means that you always need to “set up” your loop prior to Python being able to work with it (i.e. setting up a control variable).
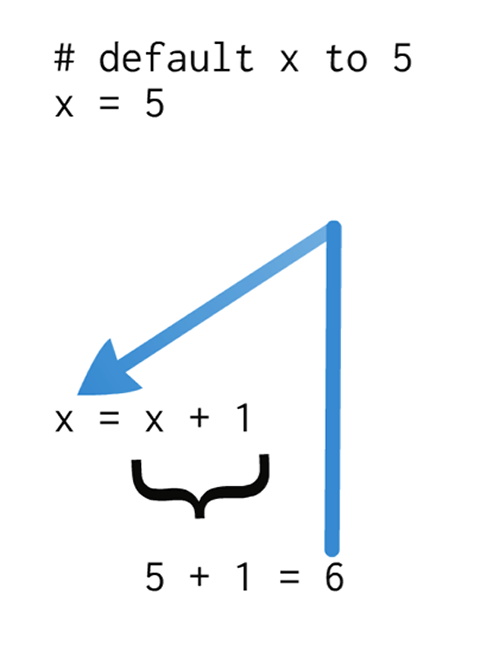
Loops are often used in conjunction with variables to control the number of times they iterate. Often we want to make changes to a variable inside of a loop (for example, to compute the running total of a series of numbers). We can do this by setting up a variable outside of our loop and then referencing that variable inside of our loop. We call these "accumulator variables." For example:
# set up a variable
a = 0

# enter into a loop
while a < 5:

	# add 1 to "a" - this is what we call a "self referential assignment"
	# we are essentially adding 1 to the current value of "a" and then
	# storing the result back into the variable
	a = a + 1

	print (a)
The self-referential assignment statement works as follows:
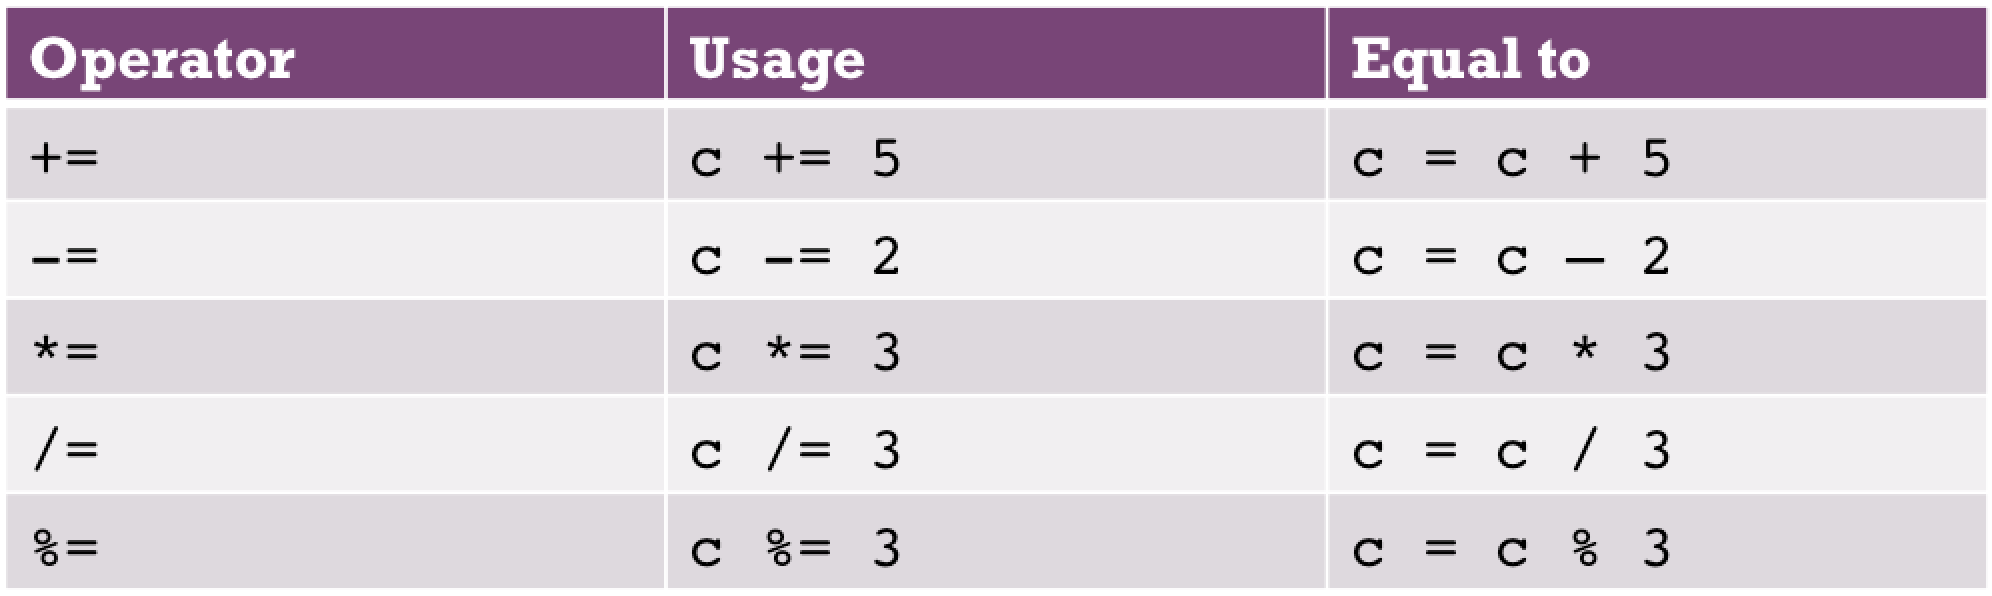
 Python also supports a series of "shortcuts" for self-referential assignments:
while loops are often used because they execute an indetermintate number of times. You can cause a while loop to execute for a set # of times (i.e. loop exactly 5 times) by using an accumulator variable. For example:
# set up a counter variable to keep track of
# how many times we have looped
numloops = 0

# create a loop that keeps going as long as
# our "numloops" variable is less than 5 - this will
# evaluate to True the first time we encounter the loop
while numloops < 5:

    # update our "numloops" variable to make a note
    # that we have looped one more time
    numloops += 1

    # do something
    print ("Iteration #", numloops)
Sample Program: This program uses a "while" loop to execute a "print" statement 10 times.
Programming Challenge: Write a simple "shopping cart" program that asks the user for a series of product prices. Compute sales tax (7%) on each price and print out the new price to the user. Next, ask the user if they want to enter another price - if they do, repeat the process. If not, end the program. Here's some sample output:
Enter an item price: 1.00
Tax on this item is 0.07 ; total price: 1.07
Enter another price? (yes or no): yes
Enter an item price: 2.00
Tax on this item is 0.14 ; total price: 2.14
Enter another price? (yes or no): yes
Enter an item price: 3.00
Tax on this item is 0.21 ; total price: 3.21
Enter another price? (yes or no): no
Click the "Run" button to see the program in action. Click here to download a copy of the solution.
Programming Challenge: Modify Challenge #1 so that your program also keeps track of the total amount spent in addition to total tax due. Here's some sample output:
Enter an item price: 1.00
Tax on this item is 0.07 ; total price: 1.07
Enter another price? (yes or no): yes
Enter an item price: 2.00
Tax on this item is 0.14 ; total price: 2.14
Enter another price? (yes or no): yes
Enter an item price: 3.00
Tax on this item is 0.21 ; total price: 3.21
Enter another price? (yes or no): no
-------
Total amount due: 6.42
Total tax due: 0.42
Hint: use two "accumulator variables" to keep track of the total price and total tax. Click the "Run" button to see the program in action. Click here to download a copy of the solution.
"while" loop control
There is always a danger with while loops that the condition associated with the loop will never evaluate to False. If that happens, the loop will continue running forever. We call this an "infinite loop". If you do end up with an infinite loop, you can force Python to break out of it by hitting Control->C on your keyboard. Here's an example of an infinite loop:
a = 5

# the value stored in the variable "a"
# never changes - it's always less than 10!
while a < 10:
	print ("I'm looping!")
And here's another example:
# no way to ever get out of this loop!
# True will never be anything but True, which
# means the condition attached to this loop will
# never be False!
while True:
	print ("I'm looping!")
There are two special commands called break and continue that you can use inside of a while loop to further control the flow of repetition. These commands can only be used inside of a while loop - they won't work anywhere else in your program.
The break command is used to immediately end a loop. Once a break statement is encoutered the loop immediately stops and Python resumes execute on the line directly after the end of the loop.
Sample Program: This program uses the "break" statement to prematurely end a loop.
The continue command is used to cause the loop to immediately cease its current iteration and re-evaluate its condition. The continue command doesn't end the loop -- it simply causes the loop to "jump" to the next iteration. If the condition evaluates to True the loop iterates again, but if it evaluates to False it will not.
Sample Program: This program uses the "continue" statement to end a loop iteration when a condition is met.
Boolean variables are often used with while loops to control their execution. We sometimes refer to these as "flags" and we can easily check their value (True or False) to determine if we should allow a loop to continue iterating or not.
Sample Program: This program demonstrates how a Boolean variable can be used as a "flag" to control a while loop.
Programming Challenge: Write a program that continually asks the user for the answer to a simple math question (2 + 2). If the user answers the question correctly you should congratulate them and end the program. If they answer the question incorrectly you should re-prompt them until they answer correctly. Here's some sample output:
What is 2+2? 3
Wrong, try again.

What is 2+2? 5
Wrong, try again.

What is 2+2? 4
Correct!
Click the "Run" button to see the program in action. Click here to download a copy of the solution.
Programming Challenge: Modify Challenge #1 so that your program prompts the user for a random addition problem instead of always asking them to answer "What is 2+2?". Click the "Run" button to see the program in action. Click here to download a copy of the solution.
Color in Turtle Graphics
Now that you know a little more about how modules work in Python we can go a little deeper into exploring how Turtle Graphics can be used to construct images ...s
Adjusting the Pen Size
You can adjust the size of the lines that your turtle cursor produces by using the pensize function. This function accepts a single float as an argument to describe how thick you want your lines to be drawn. For example, if you'd like to draw a very thin line to the screen you could call the pensize function as follows:
# make the turtle graphics functions available
import turtle

# setup our canvas
turtle.setup(500,500)

# set our pen size to be very thin
turtle.pensize(0.1)

# draw a line
turtle.forward(100)
... and to draw a very thick line you could do the following:
# ... code continued from above ...

# set our pen size to be very thick
turtle.pensize(10)

# draw a line
turtle.forward(100)
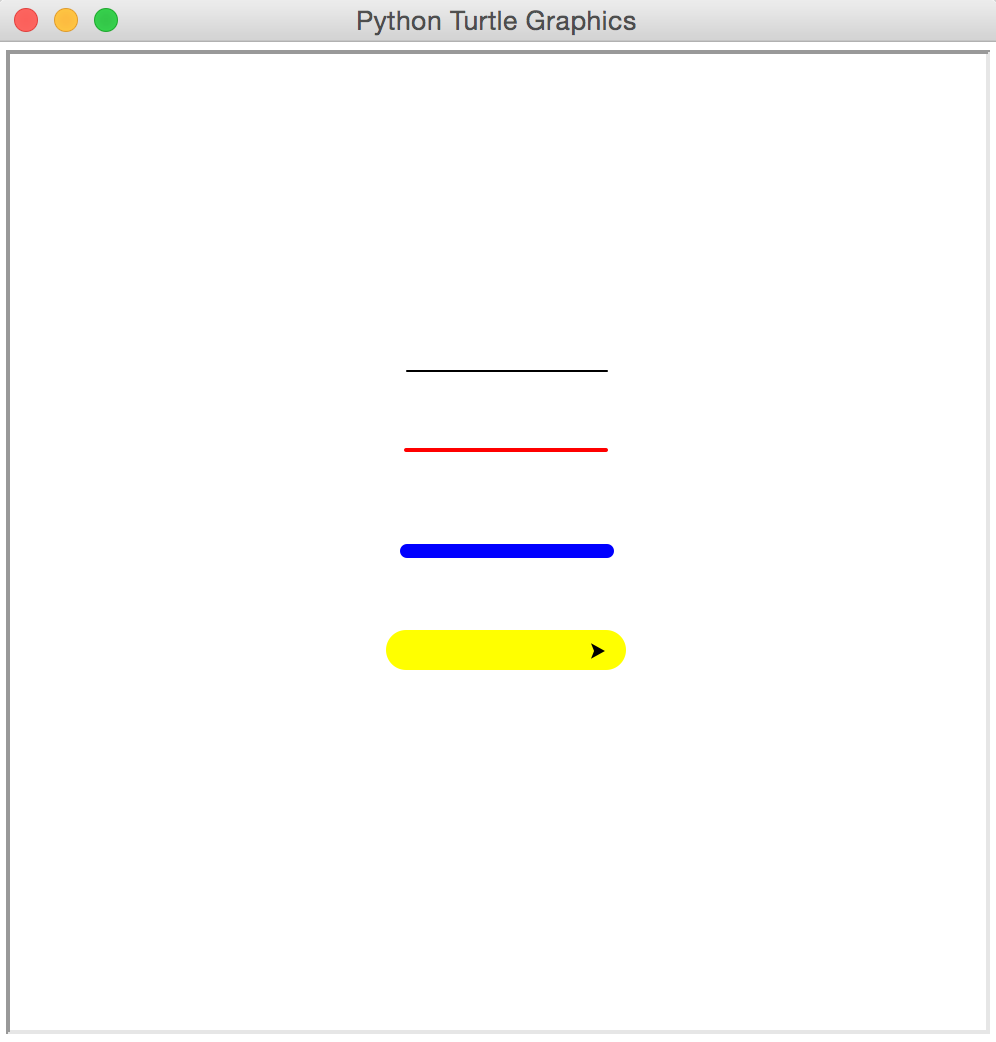
Here's a sample program that shows how the pensize function works. The drawing that will be produced from this program is also displayed below.
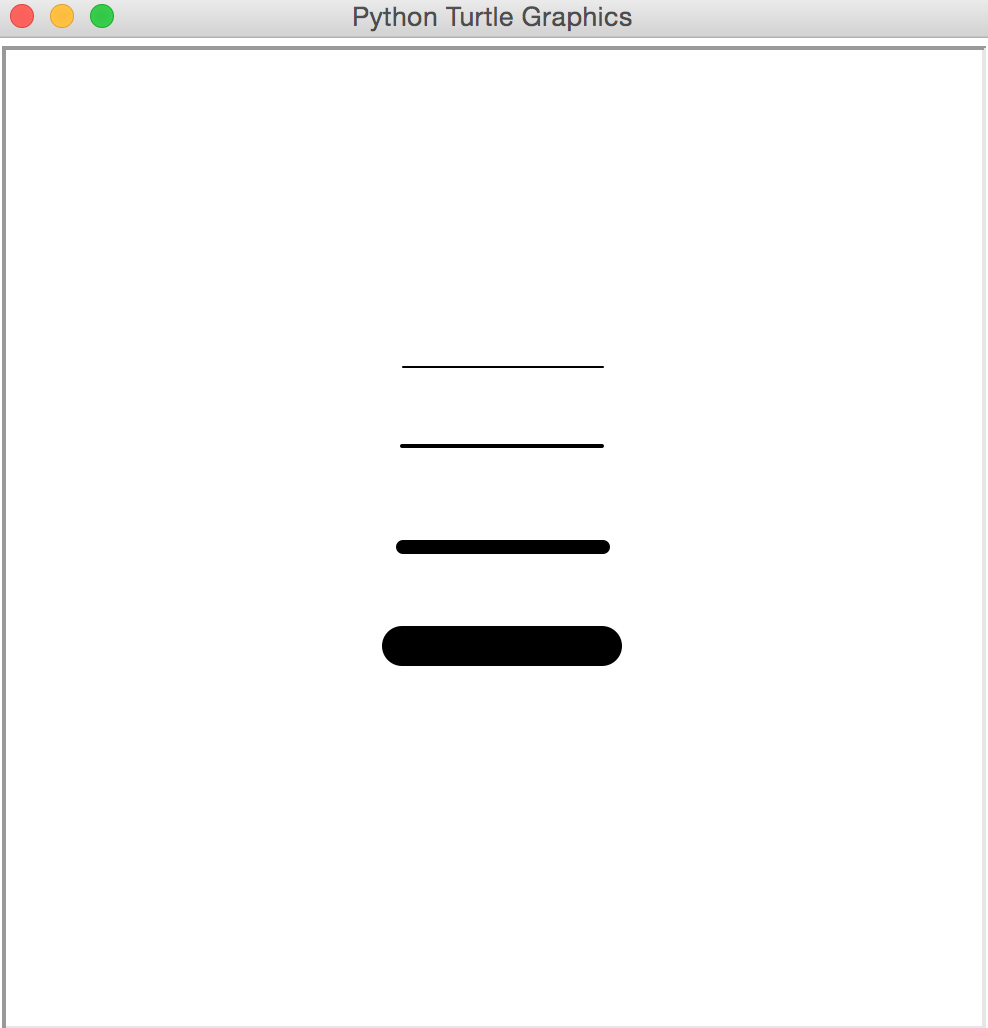
Demonstration of the pensize function
# make the turtle graphics module available
import turtle

# set up our graphical canvas
# width = 500, height = 500
turtle.setup(500, 500)

# move to the top left side of the screen
turtle.penup()
turtle.goto(-50, 90)
turtle.pendown()

# draw a very thin line
turtle.pensize(0.1)
turtle.forward(100)

# move back to the left side of the screen
# and a little further down
turtle.penup()
turtle.goto(-50, 50)
turtle.pendown()

# thicker line
turtle.pensize(2)
turtle.forward(100)

# move back to the left side of the screen
# and a little further down
turtle.penup()
turtle.goto(-50, 0)
turtle.pendown()

# thicker line
turtle.pensize(7)
turtle.forward(100)

# move back to the left side of the screen
# and a little further down
turtle.penup()
turtle.goto(-50, -50)
turtle.pendown()

# thicker line
turtle.pensize(20)
turtle.forward(100)
Setting the Pen Color
By default your turtle will draw solid black lines to the canvas. You can change this behavior by calling the pencolor function. The easiest way to use this function is to call it using a single String which represents the desired color of your pen. The turtle module understands most basic color names, such as "yellow", "red" and "green", along with some fairly non-standard names such as "wheat", "snow" and "mint cream"! A full list of supported color names can be found here.
Here's the same sample program as above (using pensize) with the addition of color:
Demonstration of the pencolor function
# make the turtle graphics module available
import turtle

# set up our graphical canvas
# width = 500, height = 500
turtle.setup(500, 500)

# move to the top left side of the screen
turtle.penup()
turtle.goto(-50, 90)
turtle.pendown()

# draw a very thin line
turtle.pensize(0.1)
turtle.forward(100)

# move back to the left side of the screen
# and a little further down
turtle.penup()
turtle.goto(-50, 50)
turtle.pendown()

# set the pen color to red
turtle.pencolor("red")

# thicker line
turtle.pensize(2)
turtle.forward(100)

# move back to the left side of the screen
# and a little further down
turtle.penup()
turtle.goto(-50, 0)
turtle.pendown()

# set the pen color to blue
turtle.pencolor("blue")

# thicker line
turtle.pensize(7)
turtle.forward(100)

# move back to the left side of the screen
# and a little further down
turtle.penup()
turtle.goto(-50, -50)
turtle.pendown()

# set the pen color to yellow
turtle.pencolor("yellow")

# thicker line
turtle.pensize(20)
turtle.forward(100)
Drawing Filled Shapes
Turtle Graphics is referred to as a "vector" graphics library. This means that shapes are described based on two properties - their outlines (referred to as "strokes") and their interiors (referred to as "fills"). So far we have been describing shapes only in terms of their "stroke" via the pensize and pencolor functions.
We can also ask Python to color the interior of our shapes by using a three new functions. Before we begin, let's drawa simple square using a red stroke color:
# make the turtle graphics module available
import turtle

# also make the random module available
import random

# set up our graphical canvas
# width = 500, height = 500
turtle.setup(500, 500)

# set up our pen
turtle.pencolor("red")
turtle.pensize(5)

# draw a square
turtle.forward(100)
turtle.right(90)
turtle.forward(100)
turtle.right(90)
turtle.forward(100)
turtle.right(90)
turtle.forward(100)
turtle.right(90)
In order to fill the interior of our square we need to tell Python what color to use as the "fill" for the shape. We can do that by calling the fillcolor function, like this:
turtle.fillcolor("yellow")
However, this only tells Python what color to use - it doesn't tell the system to actually begin filling the shape. To do this we have to call two additional functions - one of these functions tells Python to start filling a shape and ther other one tells the system that we are done drawing our shape and it's ready to be filled in. These functions, called begin_fill and end_fill are called before and after we draw our desired shape. Here's the code above with these two functions in place:
# make the turtle graphics module available
import turtle

# also make the random module available
import random

# set up our graphical canvas
# width = 500, height = 500
turtle.setup(500, 500)

# set up our pen
turtle.pencolor("red")
turtle.pensize(5)

# set up our fill color
turtle.fillcolor("yellow")

# tell Python to start filling
turtle.begin_fill()

# draw a square
turtle.forward(100)
turtle.right(90)
turtle.forward(100)
turtle.right(90)
turtle.forward(100)
turtle.right(90)
turtle.forward(100)
turtle.right(90)

# tell Python that are we are finished filling
turtle.end_fill()
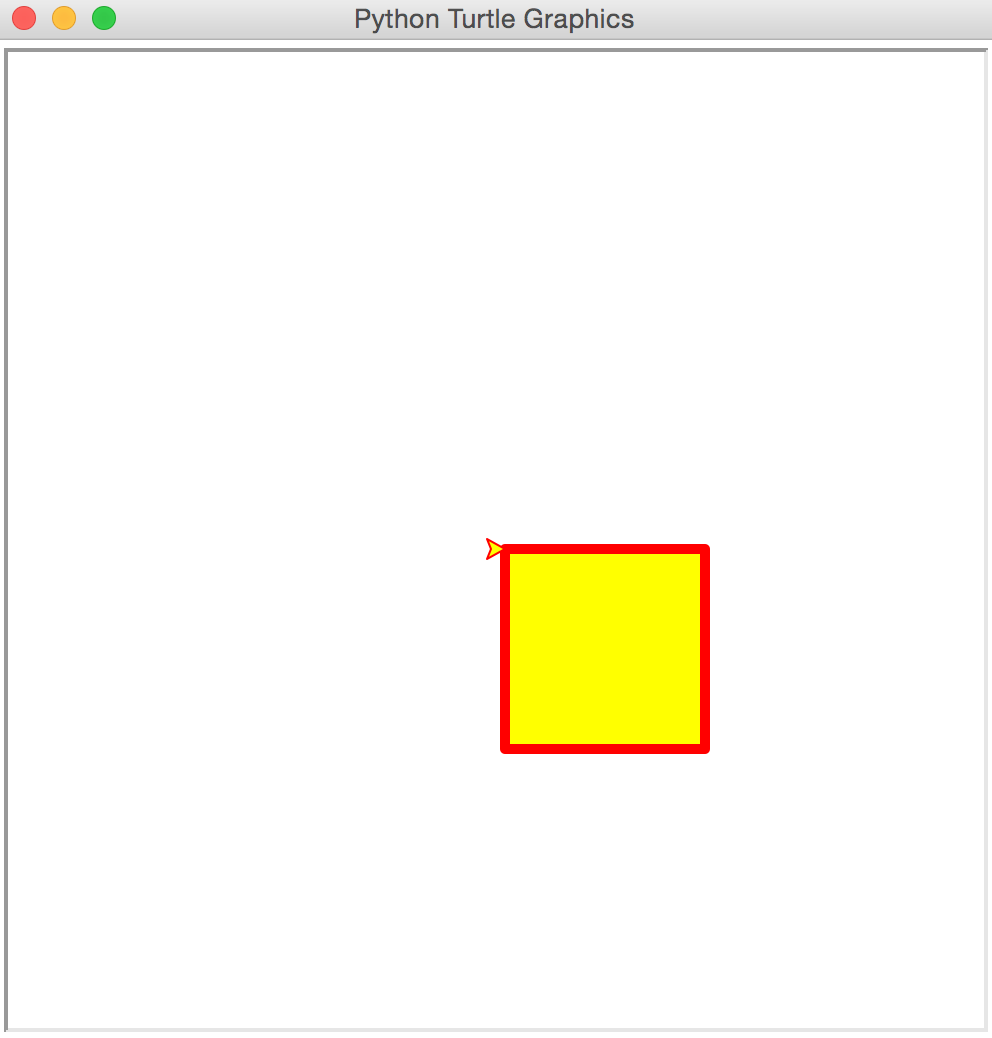
A filled shape using the pencolor, fillcolor, begin_fill and end_fill functions
Note that begin_fill and end_fill are like "bookends" - you need to include them above and below the lines of code that you're writing to render the interior of a shape.
Graphics Programming Challenges
Programming Challenge: Write a program that asks the user for a stroke color and a fill color. Then draw a square on the screen using the supplied values.
If you'd like to view the solutions download a copy.
Programming Challenge: Extend the previous program to limit the user to only supplying the values "yellow", "red", "green" or "blue". If they supply an invalid color you can print an error message and end the program. Hint: you can call turtle.bye() to close the turtle canvas window.
If you'd like to view the solutions download a copy.
Color in Turtle Graphics Part 2
Mixing your own colors
All digital color is formed by mixing together three "base" colors - red, green and blue. By varying the amount of these colors we can instruct pixels on a display to glow in any way that we want. We refer to this as RGB color (Red, Green & Blue color).
Digital designers mix together varying amounts of red, green and blue all the time to describe colors that can be used on websites, mobile applications, games, etc. For example, in Photoshop you can mix together your own color by supplying varying amounts of Red, Green and Blue using the color picker window:
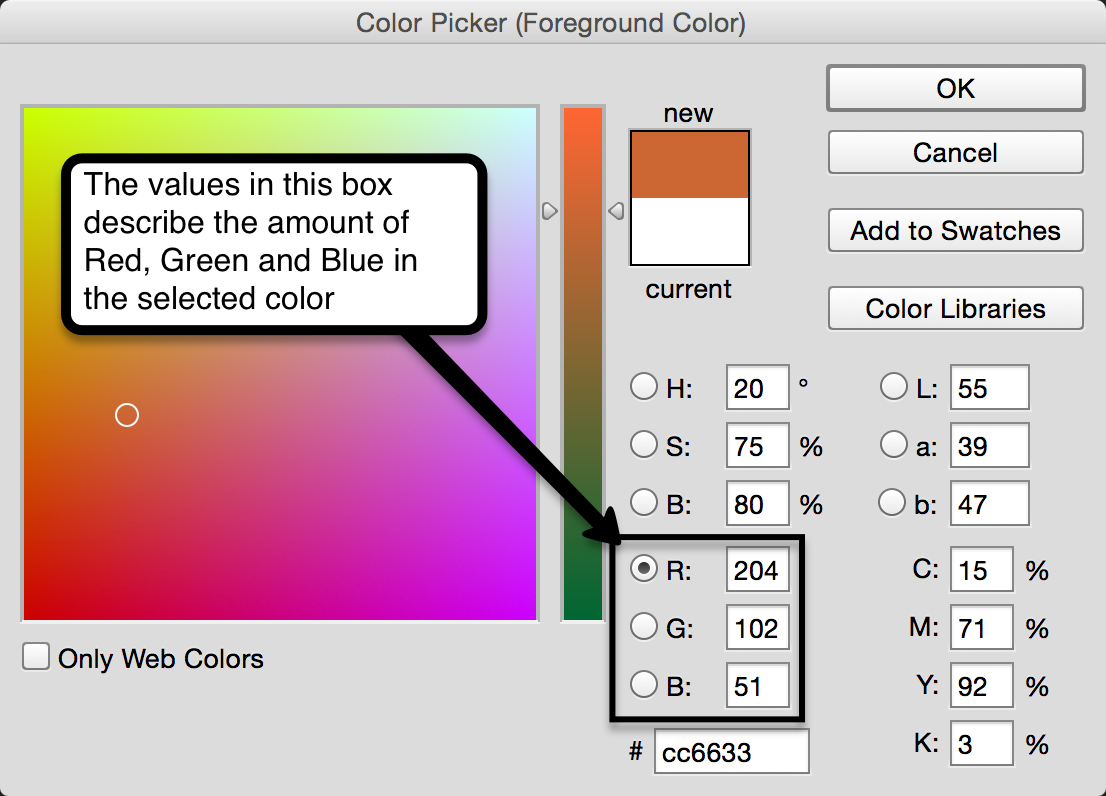
Constructing a color using varying amounts of Red, Green and Blue in Photoshop
We can do the same thing in Python by telling our program to mix together varying amounts of red, green and blue when drawing a shapes to the screen. This can be done by supplying three floating point numbers to the pencolor or fillcolor functions - the first number describes the percentage of red in the desired color, the second describes the percentage of green and the third describes the percentage of blue:
# set the pen color to red
turtle.pencolor(1.0, 0, 0) # 100% red, 0% green, 0% blue

# set the pen color to green
turtle.pencolor(0, 1.0, 0) # 0% red, 100% green, 0% blue

# set the pen color to a custom color!
turtle.pencolor(0.7, 0.2, 0.5)
Note that numbers passed to the pencolor function in this way must be between 0.0 and 1.0 (inclusive), where 0.0 represents none of that color and 1.0 represents all of that color. You can construct the color white by supplying 1.0 for all color values (100% red, 100% green and 100% blue) - likewise you can construct the color black by supplying 0.0 for all color values (0% red, 0% green, 0% blue).
Here's a variation of the line thickness program we've been writing that uses this technique:
# make the turtle graphics module available
import turtle

# set up our graphical canvas
# width = 500, height = 500
turtle.setup(500, 500)

# move to the top left side of the screen
turtle.penup()
turtle.goto(-50, 90)
turtle.pendown()

# draw a very thin line
turtle.pensize(0.1)
turtle.forward(100)

# move back to the left side of the screen
# and a little further down
turtle.penup()
turtle.goto(-50, 50)
turtle.pendown()

# set the pen color to RED using RGB color values
turtle.pencolor(1.0, 0, 0)

# thicker line
turtle.pensize(2)
turtle.forward(100)

# move back to the left side of the screen
# and a little further down
turtle.penup()
turtle.goto(-50, 0)
turtle.pendown()

# set the pen color to BLUE using RGB color values
turtle.pencolor(0, 0, 1.0)

# thicker line
turtle.pensize(7)
turtle.forward(100)

# move back to the left side of the screen
# and a little further down
turtle.penup()
turtle.goto(-50, -50)
turtle.pendown()

# set the pen color to a custom color using RGB color values
turtle.pencolor(0.7, 0.5, 0.2)

# thicker line
turtle.pensize(20)
turtle.forward(100)
Creating Random Colors
Recall that Python's random module contains functions that can be used to generate random integers or floating point values. For example, if you wanted to generate a random integer between 0 and 100 you could do the following:
num1 = random.randint(0, 100)
With a little division we could turn this number into a floating point number to express a percentage. For example, the variable 'num1' below will be a floating point number between 0.0 and 1.0 (inclusive):
num1 = random.randint(0, 100) / 100
Now we have all of the tools we need to pick random colors! We can ask Python to generate three random numbers and use them as arguments to the pencolor function - this will allow us to draw randomly colored lines to the screen. Here's an example - every time you run this program a different color will be generated!
# make the turtle graphics module available
import turtle

# also make the random module available
import random

# set up our graphical canvas
# width = 500, height = 500
turtle.setup(500, 500)

# pick a random red value!
# start by choosing a random integer between 0 and 100
# then divide it by 100 - this will generate a float between 0.0 and 1.0
red = random.randint(0, 100) / 100

# do the same thing for green and blue
green = random.randint(0, 100) / 100
blue  = random.randint(0, 100) / 100

# use these numbers to set our pen color
turtle.pencolor(red, green, blue)

# draw a line
turtle.pensize(10)
turtle.forward(100)
Quiz
Now that you've completed this module, please visit our NYU Classes site and take the corresponding quiz for this module. These quizzes are worth 5% of your total grade and are a great way to test your Python skills! You may also use the following scratch space to test out any code you want.