REVIEW: VERTICES AND FACES:
To review what we discussed in class earlier in the semester, a general way to store polyhedral meshes is to use a vertex array and a face array. Each element of the vertex array contains point/normal values for a single vertex:
vertices = { { x,y,z, nx,ny,nz }0, { x,y,z, nx,ny,nz }1, ... }
Each element of the face array contains an ordered list of the vertices in that face:
faces = { { v0,v1,v2,... }0, { v0,v1,v2,... }1, ... }
Remember that the vertices of a face should be listed in counterclockwise order, when viewed from the outside of the face.
A vertex is specified by both its location x,y,z and its normal vector direction nx,ny,nz. If vertex normals are different, then we adopt the convention that two vertices are not the same - even if x,y,z are the same.
COMPUTING NORMALS, TRANSFORMING NORMALS:
If you want to create the illusion of smooth
interpolated normals when you're approximating
rounded shapes (like spheres and cylinders)
you can do so either by using
the normalized derivative of the associated implicit surface -
which in the special case of the unit sphere
is just the same as x,y,z itself -
or else you can use the following brute force method:
To transform a normal vector, you
need to transform it by the transpose of M-1,
where M is the matrix that
you are using to transform the associate vertex location.
Here is a
MatrixInverter class
that you can use
to compute the matrix inverse.
SHADING:
Next Tuesday,
while I'm off climbing the Great Wall of China,
Elif Tosun (not Denis Zorin) will be giving a guest lecture
on how to shade a vertex.
That is, on how to convert a point/normal vertex
from (x,y,z,nx,ny,nz) to a point/color vertex (x,y,z,r,g,b).
For now, you can just test things out by using some very simple
mapping from normals to shading such as:
SCAN CONVERSION AND Z-BUFFERING:
The Z-buffer algorithm is a way
to get from triangles to shaded pixels.
You use the Z buffer algorithm
to figure out which thing is in front
at every pixel when you are creating
fully shaded versions of your mesh objects.
The algorithm starts with an empty zBuffer, indexed by pixels [X,Y],
and initially set to zero for each pixel (ie: 1 / &inf;).
You also need an image FrameBuffer filled
with background color.
You already have an image FrameBuffer
within your MISApplet.
The general flow of things is:
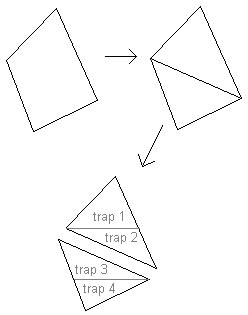
You may end up with
a four sided shape, which you need to split into
two triangles,
and then do all the steps that follow
independently
for each of these two triangles.
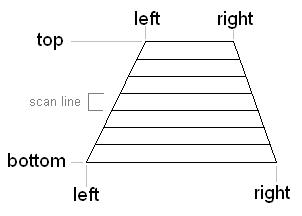
(XBL, YBOTTOM) (XBR, YBOTTOM)
You can see the process repesented here:
First a polygon is split into triangles,
and the each triangle is split into scan-line aligned
trapezoids:
Each vertex of one of these scan-line aligned trapezoids
will have both color and perspective z, or (r,g,b,pz).
If pz < zBuffer[X,Y] then replace the values at that pixel:
A note about linear interpolation:
In order to interpolate values from the triangle
to the trapezoid, then from the trapezoid to
the horizontal span for each scan-line, then
from the span down individual pixels,
you do linear interpolation.
Generally speaking, linear interpolation
involves the following two steps:
In order to compute t, you just need your
extreme values and the intermediate value
where you want the results.
For example, to compute the value of t
to interpolate from scan-line Y_TOP and Y_BOTTOM
to a single scan-line Y:
I suggest you get your algorithm working on a single
example triangle before trying to apply the algorithm
working on your actual scene data.
You might want to do the straightforward linear
interpolation described above for your first implementation,
and then switch over to the incremental methods that we
discussed in class after you have gotten a visible result.
If you recall from class,
the fast incremental method involves
first computing an increment for each numeric value
at each stage of of interpolation,
first for incrementing the change in value per scan-line
for the outer-loop vertical interpolation,
and then for incrementing the change in value per horizontal pixel
along a single scan-line.
And, as we said in class, to make incremental methods
run blazingly fast, you would do these incremental calculations
not in floating point
but in fixed point integer, shifting up temporarily by some reasonable
number of bits such as 12.
r = g = b = 255 * (1 + nx + ny + nz) / 2.75;
or you can play around with other more colorful mappings if you'd like.


zBuffer[X,Y] ← pz
frameBuffer[X,Y] ← (r,g,b)
value = a + t * (b - a)
t = (double)(Y - YTOP) / (YBOTTOM - YTOP)
Similarly, to compute the value of t
to interpolate from pixels X_lEFT and X_RIGHT
to values at a single pixel X:
t = (double)(X - XLEFT) / (XRIGHT - XLEFT)