VERTICES AND FACES:
To review what we discussed in class earlier in the semester, a general way to store polyhedral meshes is to use a vertex array and a face array. Each element of the vertex array contains point/normal values for a single vertex:
vertices = { { x,y,z, nx,ny,nz }0, { x,y,z, nx,ny,nz }1, ... }
Each element of the face array contains an ordered list of the vertices in that face:
faces = { { v0,v1,v2,... }0, { v0,v1,v2,... }1, ... }
A vertex is specified by both its location and its normal vector direction. As I said in class, if vertex normals are different, then we'll adopt the convention that two vertices are not the same - even if x,y,z are the same.
COMPUTING NORMALS, TRANSFORMING NORMALS:
If you want to create the illusion of smooth
interpolated normals when you're approximating
rounded shapes (like spheres and cylinders)
you can do so either by using special
purpose methods for that particular shape (like using the direction
from the center of a sphere to each vertex - as
we discussed in class),
or else you can use the following more general purpose method:
To transform a normal vector, you
need to transform it by the transpose of M-1,
where M is the matrix that
you are using to transform the associate vertex location.
Here is a
MatrixInverter class
that you can use
to compute the matrix inverse.
As usual, try to make fun, cool and interesting content.
See if you can make various shapes that are built up from
things like tubes and cylinders or tori, as in
the applet I showed in class.
We haven't done all the math
yet that we would need to do spline surfaces like teapots.
MATERIALS AND LIGHTS:
When rendering a phong-shaded scene
you will want to have a list of Materials,
where each Material object gives the data that
you need to simulate a particular
kind of surface using the Phong algorithm
(eg: DiffuseColor, SpecularColor, etc.).
You will also want to have a list of Light sources,
where each light source Li has a direction
(x,y,z) and a illuminance color (r,g,b):
Z-BUFFERING:
The Z-buffer algorithm is a way
to get from triangles to shaded pixels.
You use the Z buffer algorithm
to figure out which thing is in front
at every pixel when you are creating
fully shaded versions of your mesh objects,
such as when you use the Phong surface shading algorithm.
The algorithm starts with an empty zBuffer, indexed by pixels [X,Y],
and initially set to zero for each pixel.
You also need an image FrameBuffer filled
with background color.
This frameBuffer can be the pix[] array you currently use for ray tracing.
The general flow of things is:
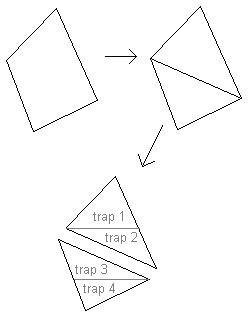
You may end up with
a four sided shape, which you need to split into
two triangles,
and then do all the steps that follow
independently
for each of these triangles.
(XBL, YBOTTOM) (XBR, YBOTTOM)
You can see the process repesented here:
First a polygon is split into triangles,
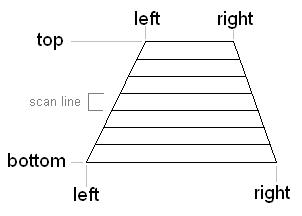
and the each triangle is split into scan-line aligned
trapezoids:
Each vertex of one of these scan-line aligned trapezoids
will have both color and perspective z, or (r,g,b,pz).
If pz < zBuffer[X,Y] then replace the values at that pixel:
A note about linear interpolation:
In order to interpolate values from the triangle
to the trapezoid, then from the trapezoid to
the horizontal span for each scan-line, then
from the span down individual pixels,
you'll need to use linear interpolation.
Generally speaking, linear interpolation
involves the following two steps:
In order to compute t, you just need your
extreme values and the intermediate value
where you want the results.
For example, to compute the value of t
to interpolate from scan-line Y_TOP and Y_BOTTOM
to a single scan-line Y:
Li = { x , y , z , r , g , b }
zBuffer[X,Y] ← pz
frameBuffer[X,Y] ← (r,g,b)
value = a + t * (b - a)
t = (double)(Y - YTOP) / (YBOTTOM - YTOP)
Similarly, to compute the value of t
to interpolate from pixels X_lEFT and X_RIGHT
to values at a single pixel X:
t = (double)(X - XLEFT) / (XRIGHT - XLEFT)