Released Monday, April 1, 2013
Due Friday, April 19, 2013, 11:59 PM
In this lab, you will implement a simple disk-based file system, using Linux and FUSE (not JOS). The file system includes structures that are fundamental to typical UNIX file systems, including indirect blocks and inodes. By leveraging the driver code that we provide, you will be able to mount disk images formatted for this file system in Linux and interact with the files and directories contained therein -- as you would with any other file system that Linux supports.
You are programming in pairs for this assignment.
Use Git to commit your Lab 6 source (if you haven't already), fetch the latest version of the course repository, and then create a local branch called lab7 based on our lab7 branch, origin/lab7:
tig% cd ~/cs439/labs
tig% git commit -am 'my solution to lab6'
nothing to commit (working directory clean)
tig% git pull
Already up-to-date.
tig% git checkout -b lab7 origin/lab7
Branch lab7 set up to track remote branch refs/remotes/origin/lab7.
Switched to a new branch "lab7"
tig% make tidy
Removing ...
tig%
For this lab, you will have to do development on a 64-bit CS Linux machine, as the libraries needed to compile the file system driver are installed only on these machines. To get a list of these machines, you can use the cshosts command on any CS Linux machine. The following groups of machines are verified to work with the lab:
We have provided a substantial amount of code for you for lab 7, which handles the bulk of the work for creating a file system abstraction in Linux based on a few fundamental operations that you will implement. You should acquaint yourself with the code that we have provided in the following files:
As usual, you must complete all numbered exercises set forth in the lab and also answer all numbered questions in a file called answers.txt. When you are ready to hand in your lab code, create a file called slack.txt noting how many slack hours you have used both for this assignment and in total. (This is to help us agree on the number that you have used.) Then run make turnin in the lab directory. This will first do a make clean to clean out any .o files and executables, and then create a tar file called lab7-handin.tar.gz with the entire contents of your lab directory and submit it via the CS turnin utility. If you submit multiple times, we will take the latest submission and count slack hours accordingly.
The file system you will work with is much simpler than most "real" file systems including that of xv6 UNIX, but it is powerful enough to provide the basic features: creating, reading, writing, and deleting files organized in a hierarchical directory structure.
Our file system supports all the traditional UNIX notions of file ownership, permissions, hard and symbolic links, time stamps, and special device files. Perhaps surprisingly, much of this functionality will come for free (or very low cost) after writing just a small number of core file system operations. Some of the ease in supporting these traditional UNIX file system notions comes from our driver's use of FUSE, or Filesystem in Userspace, which is a library and Linux kernel module which allows our driver to create a file system abstraction in Linux. We will talk more about FUSE later in the lab.
Most UNIX file systems divide available disk space into two main types
of regions:
inode regions and data regions.
UNIX file systems assign one inode to each file in the file system;
a file's inode holds critical meta-data about the file
such as its stat attributes and pointers to its data blocks.
The data regions are divided into much larger (typically 8KB or more)
data blocks, within which the file system stores
file data and directory meta-data.
Directory entries contain file names and pointers to inodes;
a file is said to be hard-linked
if multiple directory entries in the file system
refer to that file's inode.
Our file system supports hard links, so we will be using
inodes to provide the level of indirection required for this feature.
However, unlike most UNIX file systems, we make a simplification in
the layout of the file system: there is only one region on the disk,
in which both inode blocks and data blocks reside. Furthermore, each
inode is allocated its own block instead of being packed alongside
other inodes in a single block.
Both files and directories logically consist of a series of data blocks, which may be scattered throughout the disk much like the pages of an process's virtual address space can be scattered throughout physical memory. The file system environment hides the details of block layout, presenting interfaces for reading and writing sequences of bytes at arbitrary offsets within files. The file system driver handles all modifications to directories internally as a part of performing actions such as file creation and deletion.
The UNIX xv6 file system uses a block size of 512 bytes, the same as the sector size of the underlying disk. Most modern file systems use a larger block size, however, because storage space has gotten much cheaper and it is more efficient to manage storage at larger granularities. Our file system will use a block size of 4096 bytes, conveniently matching the processor's page size.
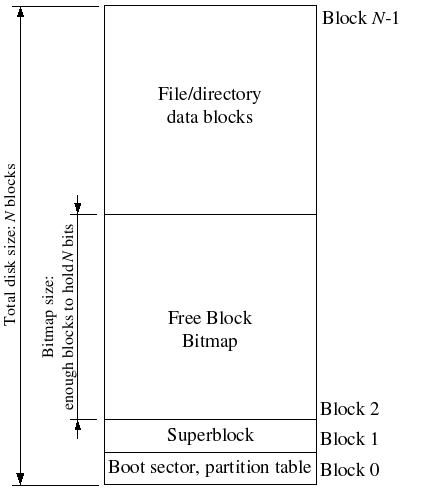
File systems typically reserve certain disk blocks at "easy-to-find" locations on the disk (such as the very start or the very end) to hold meta-data describing properties of the file system as a whole, such as the block size, disk size, any meta-data required to find the root directory, the time the file system was last mounted, the time the file system was last checked for errors, and so on. These special blocks are called superblocks.
Our file system will have exactly one superblock,
which will always be at block 0 on the disk.
Its layout is defined by struct superblock in fs_types.h.
Block 0 is typically reserved to hold boot loaders and partition tables,
so file systems generally do not use the very first disk block.
Since our file system is not meant to be used on a real disk, we use
block 0 to store the superblock for simplicity.
Many "real" file systems maintain multiple superblocks,
replicated throughout several widely-spaced regions of the disk,
so that if one of them is corrupted
or the disk develops a media error in that region,
the other superblocks can still be found and used to access the file system.
In the same way that the kernel must manage the system's physical memory
to ensure that a given physical page is used for only one purpose at a time,
a file system must manage the blocks of storage on a disk
to ensure that a given disk block is used for only one purpose at a time.
In JOS, you kept the Page structures
for all free physical pages
on a linked list, page_free_list,
to keep track of the free physical pages in pmap.c.
In file systems it is more common to keep track of free disk blocks
using a bitmap rather than a linked list,
because a bitmap is more storage-efficient than a linked list
and easier to keep consistent.
Searching for a free block in a bitmap can take more CPU time
than simply removing the first element of a linked list,
but for file systems this isn't a problem
because the I/O cost of actually accessing the free block after we find it
dominates for performance purposes.
To set up a free block bitmap, we reserve a contiguous region of space on the disk large enough to hold one bit for each disk block. For example, since our file system uses 4096-byte blocks, each bitmap block contains 4096*8=32768 bits, or enough bits to describe 32768 disk blocks. In other words, for every 32768 disk blocks the file system uses, we must reserve one disk block for the block bitmap. A given bit in the bitmap is set if the corresponding block is free, and clear if the corresponding block is in use. The block bitmap in our file system always starts at disk block 1, immediately after the superblock. For simplicity we will reserve enough bitmap blocks to hold one bit for each block in the entire disk, including the blocks containing the superblock and the bitmap itself. We will simply make sure that the bitmap bits corresponding to these special, "reserved" areas of the disk are always clear (marked in-use).
The layout of the meta-data describing a file in our file system is
described by struct inode in fs_types.h. This
meta-data includes the file's size, type (regular file, directory,
symbolic link, etc.), time stamps, permission information,
and pointers to the blocks comprising the file. Because our file
system supports hard-links, one inode may be referred to by more than
one name (which is why the inode itself does not store this
information). The meta-data describing the name of a inode is stored
instead in directory entries on disk. Unlike in most "real" file
systems, for simplicity we will use this one inode
structure to represent file meta-data as it appears both on disk
and in memory.
The i_direct array in struct inode contains
space to store the block numbers of the first 10
(N_DIRECT) blocks of the file, which we will call the
file's direct blocks. For small files up to 10*4096 = 40KB in
size, this means that the block numbers of all of the file's blocks
will fit directly within the inode structure itself. For
larger files, however, we need a place to hold the rest of the file's
block numbers. For any file greater than 40KB, therefore, we will
allocate an additional disk block, called the file's indirect
block, to hold up to 4096/4 = 1024 additional block numbers,
pushing the maximum file size up to 1034*4096 = 4136KB, or a little
over 4MB. To make the file system somewhat more "real" and usable,
we will also support double-indirect blocks, which allow us to
store even more blocks. A double-indirect block
(i_double in our inode structure) stores
4096/4 = 1024 additional
indirect block numbers, which themselves each store 1024
additional direct block numbers. This affords us 1024*1024*4096 =
4GB worth of data, bringing our maximum file size to a little over
4GB, in theory. However, because of address space limitations on
32-bit systems, the practical
maximum file size is much smaller (since the disk is mapped into
memory with mmap in our file system driver). 64-bit
systems do not have this limitation on the size of an individual
file.
To support even larger files,
"real" file systems typically support triple-indirect blocks
(and sometimes beyond) and have more complicated caches to support
these large files in practice.
A inode structure in our file system can represent a
regular file, a directory, a symbolic link, or any other
special file (such as a FIFO); these types of "files" are
distinguished by the i_type field in the
inode structure. The file system manages all these
types of files in exactly the same way, except that it does not
interpret the contents of the data blocks associated with regular
files at all, whereas the file system interprets the contents of
other kinds of files. The file system interprets the contents of
a directory-file as a series of dirent (also
described in fs_types.h) structures describing,
effectively, the files and subdirectories within the directory.
A dirent structure represents a pair comprising of a
name and a block number of an inode, which allows
us to map a file name to the inode containing the data for the
requested file. Note that the dirent does not
actually contain any other information about the inode; to find
out if a file is a regular file or a directory, one must actually
read the inode structure that the
dirent refers to. Also, remember that a inode may
be pointed to by more than one dirent. The contents
of a symbolic link file are interpreted as a path to
another file. Other special files (like FIFOs and devices) are
handled specially by the kernel.
The superblock in our file system contains a reference to a block
containing the "root" inode (the s_root field in
struct superblock). This inode contains the meta-data for the
file system's root directory. The root
inode contains a sequence of dirent structures describing
the files and directories linked within the root directory of the file
system. Any subdirectories in the root directory may in turn contain
more dirent structures linking to sub-subdirectories, and
so on.
The goal for this lab is not to have you implement the entire file system, but for you to implement only certain key components. In particular, you will be responsible for allocating disk blocks; mapping file offsets to disk blocks; and freeing disk blocks allocated in inodes. Because you will not be implementing all of the file system yourself, it is very important that you familiarize yourself with the provided code and the various file system interfaces.
Though we mention reading from and writing to the disk many times in this
document, the actual "disk" you will interact with as you read
and write blocks in the file system driver is just a file which
lives in a file system on the Linux machines (which could be on
a local disk or over a network). This file is referred to as a
disk image. Your view of the disk, from a programmatic
standpoint, is also
different: instead of reading and writing blocks to disk using
read and write syscalls, as you have done
previously in labsh, the driver code we
provide maps the disk image into memory using the
mmap syscall. In short, mmap reserves a
portion of the running process's virtual address space to provide
read and write access to a file as if it were an array in memory.
For example, if file is the pointer to the first
byte of the file in memory after mmaping,
writing ((char *)file)[5] =
3 is approximately equivalent to the two calls
lseek(fd, 5, SEEK_SET) and then write(fd,
<location of byte 3>, 1). To flush any in-memory changes
you've made to a file onto the disk, you would use the
msync function. To unmap the file from virtual memory,
use munmap. As always, you can check the man pages
for more information on these functions. For this lab, you will
not need to be intimately familiar with their operation, but you
should have a high-level understanding of what they do.
At its core, what allows our driver to provide the abstraction of a file system to Linux is FUSE, Filesystem in Userspace, which is a kernel module and userspace library to allow programs in userspace to provide this abstraction. Normally, adding support for a file system to Linux (or most other common operating system kernels) requires writing a kernel module, which will run in privileged (i.e. supervisor) mode. The downside to this is that if this new kernel module has a bug, it could potentially take down the entire system. However, userspace programs do not have this problem: when a userspace program crashes, it does not cause the rest of the system to crash (and, in fact, you implemented this kind of isolation in lab 5). By allowing userspace programs to provide support for file systems, FUSE reduces the amount of file system support code that needs to be run in supervisor mode, which in turn reduces the number of places for bugs to crop up in the kernel.
In a nutshell, FUSE allows a user program (a.k.a. a driver) to handle some of the syscalls associated with I/O, like read and write. When run, a FUSE driver is associated with a particular directory, or mount point, under which it presents Linux with a new directory structure. Any I/O operations requested on files and directories under this mount point are dispatched by the kernel to the FUSE driver. Here's an example from the staff solution to show what this looks like, where testfs.img is a disk image with only the root directory and the file hello on its file system:
tig% mkdir mnt # create a directory to serve as a mount point
tig% df mnt # see what file system mnt is associated with
Filesystem                  Size  Used Avail Use% Mounted on
filer4b:/vol/vol38/v38q001  714G  677G   37G  95% /v/filer4b/v38q001
tig% ls mnt
tig% build/fsdriver testfs.img mnt # mount testfs.img at mnt
tig% df mnt # note that mnt's file system is now different
Filesystem          Size  Used Avail Use% Mounted on
cs439fs#testfs.img  8.0M   24K  8.0M   1% /v/filer4b/v38q001/imr/fslab/mnt
tig% ls mnt # and there's the hello file
hello
tig% cat mnt/hello # which we can read with any program
Hello, world!
tig% fusermount -u mnt # unmount mnt
tig% df mnt # and its associated file system is back to normal
Filesystem                  Size  Used Avail Use% Mounted on
filer4b:/vol/vol38/v38q001  714G  677G   37G  95% /v/filer4b/v38q001
tig% ls mnt # and hello is gone, but still lives in testfs.img
tig%
Note that in the above example, after we run fsdriver, the kernel is actually dispatching the all the open, read, readdir, etc. calls that ls and cat make to our driver. The driver takes care of searching for a file when open is called, reading file data when read is called, and so on. When fusermount is run, our file system is unmounted from mnt, and then all I/O operations under mnt return to being serviced normally by the kernel.
If you're interested in learning about the internals of FUSE, you can read more about it at its homepage.
The main driver code that we've provided for you resides in fsdriver.c. This file contains all the FUSE callbacks to handle I/O syscalls, as well as the main function. Once the path to the disk image and the path to the mount point have been parsed from its command line arguments, the driver maps the specified disk image into memory using the map_disk_image function (defined in disk_map.c), which itself does some initialization of structures you will use (such as the in-memory superblock and bitmap pointers). Then, fuse_main is called, which handles kernel dispatches to our I/O syscall handlers. It is in this setting that the functions you write in the coming exercises are called.
After map_disk_image sets the bitmap pointer, we
can treat bitmap as a packed array of bits, one for each
block on the disk. See, for example, block_is_free,
which simply checks whether a given block is marked free in the
bitmap.
Exercise 1. Before starting any work on the driver, run ./chmod-walk in the lab 7 branch. This will set up permissions in the directories leading up to your lab directory correctly so that you will be able to run the driver successfully. Without running this script, FUSE will be unable to mount or unmount file systems in your lab directory.
Remember to do your work on one of the 64-bit CS Linux hosts as shown at the beginning of this lab!
Exercise 2.
Use free_block as a model to
implement alloc_block in bitmap.c,
which should find a free disk
block in the bitmap, mark it used, and return the number of that
block.
When you allocate a block, you should immediately flush
the changed bitmap block to disk with flush_block, to
help file system consistency. Under the hood,
flush_block calls msync to schedule the disk
block in memory to get flushed to the actual disk image.
Running our tests alone may not provide you with enough information to debug a problem if any problems crop up. In these cases, you may find it helpful to run the driver directly. First, you'll need to create a disk image to use for testing. The easiest way to do this is to run test/testbasic.bash. As a side effect, this creates a disk image, testfs.img, which is set up properly for the internal tests in the driver. Then, to run the driver, open up a new terminal to the same CS Linux machine and run either build/fsdriver testfs.img mnt --test-ops (to run the internal file system tests and exit without mounting) or build/fsdriver -d testfs.img mnt (to run the driver in debugging mode and mount testfs.img at mnt; in debugging mode, the driver shows a trace of the syscalls dispatched to the driver on the console). You can also run fsdriver in gdb. To unmount testfs.img from mnt, run fusermount -u mnt.
Use make grade to test your code. Your code should now pass "alloc_block". All code for "core file system operations" tests is in the fs_test function in fsdriver.c, so if this test or any other test specifically mentioned in the exercises fails, you can check there to see what might be going wrong.
We have provided a variety of functions in dir.c and inode.c
to implement the basic facilities you will need
to interpret and manage inode structures,
scan and manage the entries of directory-files,
and walk the file system from the root
to resolve an absolute pathname.
Read through all of the code in these files
and make sure you understand what each function does
before proceeding.
Exercise 3. Implement
inode_block_walk
and inode_get_block in inode.c. inode_block_walk maps
from a block offset within a file to the pointer for that block in the
struct inode or the indirect blocks, very much like what
pgdir_walk did for page tables in JOS.
inode_get_block goes one step further and maps to the
actual disk block, allocating a new one if necessary.
Use make grade to test your code. Your code should pass "inode_open", "inode_get_block".
Exercise 4. Implement
inode_truncate_blocks in inode.c.
inode_truncate_blocks frees data and metadata blocks
allocated by an inode that are no longer in use. This is used, for
instance, when an inode is deleted; the space reserved by the inode
must be freed so that other files can be created on the system.
Use make grade to test your code. Your code should pass "inode_flush/inode_truncate/file rewrite".
inode_block_walk and inode_get_block are the
workhorses of the file system. For example, inode_read
and inode_write are little more than the bookkeeping atop
inode_get_block necessary to copy bytes between scattered
blocks and a sequential buffer.
Exercise 5. Implement
inode_link and inode_unlink in
inode.c.
inode_link links an inode referenced by one path to
another location, and inode_unlink removes a reference to
an inode at a specified path. Make sure that you properly increment
the link count in an inode when linking and decrement the link count
when unlinking. Don't forget to free an inode when its link count
reaches zero!
Use make grade to test your code. Your code should pass "inode_link/inode_unlink".
inode_link and inode_unlink allow us to
exploit the level of indirection provided by using inodes in our file
system (as opposed to storing all file meta-data inside of
directories, for instance) and manage referencing inodes with multiple
names. The inode_unlink operation is particularly
important as it allows us to release the space reserved for an inode,
acting as a "remove" operation when an inode's link count is one.
The tests after "inode_link/inode_unlink" are all effectively stress tests, in some way or another, for the driver. Each of them relies on the core functionality you implemented in the exercises in this lab, and some of them can fail if you didn't handle certain edge cases correctly. If you fail one of these tests, go back and check the logic in your code to make sure you didn't miss anything.
Challenge! The file system is likely to be corrupted if it gets interrupted in the middle of an operation (for example, by a crash or a reboot). Implement soft updates or journalling to make the file system crash-resilient and demonstrate some situation where the old file system would get corrupted, but yours doesn't.
Challenge!
Currently, our file system allocates one block (4096 bytes)
per inode. However, each struct inode only takes
up 64 bytes. If we were clever with file system design, we
could store 4096/64 = 64 inodes in every block. Modify the
file system so that inodes are stored more compactly on disk.
You may want to make the file system more like a
traditional UNIX file system by splitting up the disk into
inode and data regions, so that it is easier to reference
inodes by an index (generally called an "inum" for "inode
number") into the inode region.
Questions
Answer the following questions in answers.txt.
This completes the lab. As usual, don't forget to run make grade and to write up your answers and a description of your challenge exercise solution. Before handing in, use git status and git diff to examine your changes and don't forget to git add answers.txt. When you're ready, commit your changes with git commit -am 'my solutions to lab 7', then make turnin and follow the directions.
Last updated: Fri Apr 12 11:26:19 -0500 2013 [validate xhtml]