Lab Exercise 1: Producing XML
Objective
This lab exercise will help you review the introduction material on XML covered in the lecture slides presented during session 5 of the XML for Java Developers course. The intent of this lab is to provide you with a practical understanding of how to produce XML.
Overview
For simple purposes creating XML files can be done quite easily by writing an XML file according to a certain XML schema. This can be done either manually from scratch or assisted by a software tool. Several programs offer this functionality (e.g. Altova XMLSpy 2005, IBM WebSphere Studio Application Developer 5.1.2, Visual Studio .Net 2003). IBM WSAD can also generate an XML file that is valid according to given XML schema. The major problem with this way of creating XML files is the need for manually padding the files with data. The assistance of the tools is helpful but the creation of large XML files is still very cumbersome.
A more powerful means to create XML files is to write a
program or a script e.g. using Java or C#. Java and C# users benefit from the
presence of XML APIs like DOM, SAX, and JAXP that ease the work with XML. The
downside of an application is its inflexibility of being adapted to different
XML schemas. Modifications of XML schemas result in continuous adjustments of
the program code.
In this lab, you will study how
to generate an XML document using IBM WSAD and how to produce an XML documents
using Java within WSAD.
Your Challenge
To produce an XML document, you need to know how to generate
an XML document from an XML schema, or write a program to generate and XML
document. Therefore, your challenge in this lab is to learn how to perform these
tasks within a tool such as IBM WSAD. In the first part of this lab, you will
learn how to create an XML schema using the WSAD XML schema editor and how to
generate an XML document from it. In the second part of the lab, you will
survey the various means of creating XML documents programmatically using XML
APIs for Java within WSAD. For the purpose of this exercise, you will work on a
couple of tangible examples of XML documents including purchase orders and user
information records.
Step-by-Step Guide
Part One: Producing an XML File with WSAD
1. Create a project
a. Click on File > New > Project >.
b. In the New Project Select dialog box, select Simple in the left pane and click Next.
c. In the New Project Project dialog box, enter MyXMLProject as the Project name and click Finish.
d. Switch to the XML perspective (Window > Open Perspective > Other > XML).
2. Creating the
XML schema
a.
In the workbench, select File > New >
XML Schema.
b. Click
the MyXMLProject folder. In the File name field, type
PurchaseOrder.xsd as the name of the XML schema.
c. Click
Finish. PurchaseOrder.xsd appears under MyProject in the Navigator view
and automatically opens in the XML schema editor.
d. Look
at the Outline view (Window > Show View > Outline). This view will
show you all the items in your XML schema as you add them. The Graph View of the
edit area of the workbench shows a detailed Design view for the XML schema
editor.
e. At
any time, you can switch to the Source view to review the source for the XML
schema. You can also edit your schema in the Source view, however, any changes
you make in the Source view will not automatically be reflected in the Outline
view or the Tasks view.
2. Creating the
Structure of the XML schema
You will now add an annotation, two global elements,
three complex types and a simple type to the PurchaseOrder schema.
a. In
the Outline view, right-click PurchaseOrder and right-click Add
Annotation. This creates a new annotation element and a new documentation
element (which is used for comments) for the schema.
b. The
annotation element is simply a container for the documentation element; it does
not actually contain any information itself.
c. Right-click
PurchaseOrder and click Add Global Element. In the Graph view,
change the name of the global element to PurchaseOrder.
d. Repeat
the previous step, changing the name of the global element you just created to Comment.
e. Right-click
the PurchaseOrder schema and click Add Complex Type. In the Graph
view of the edit area, change the name of the complex type to
PurchaseOrderType.
f.
Repeat the previous step twice, changing the name of
the complex types to USAddress and Items.
g. Right-click
the PurchaseOrder schema and click Add Simple Type. In the Graph
view, change the name of the simple type to SKU.
3. Filing in the
Details
Now that you have created the general outline for the XML schema, you will go back to each object to fill in the necessary details.
a. In
the Outline view, click the documentation object. In the Source view, position
the cursor within the start and end documentation tags and type some comments
(for example, This is a Purchase Order schema.) in the Comment field on the
Design view.
b. Click
the global element purchaseOrder. In the Design view, click the User-defined
complex type radio button. Select PurchaseOrderType as its
type.
c. Right-click
the complex type PurchaseOrderType and click Add Content Model.
d. Right-click
the content model and click Add Element. In the Design view, change the
element's name to shipTo. Click the User-defined complex type radio
button. Select USAddress as its type.
e. Add
another element to the content model, and change its name to billTo. Click the User-defined
complex type radio button and select USAddress as its type.
f.
Right-click the content model and click Add Element
Ref. This will add a new element reference to a global element. Change the
element reference to the global element comment by selecting Comment from
the Reference name list.
g. Right-click
the content model and click Add Element. Change its name to items.
Change its kind of type to User-defined complex type and select Items
as its type.
You will now fill in the details for the complex type USAddress.
a. Right-click
the complex type USAddress and click Add Content Model.
b. Right-click
the content model and click Add Element. In the Design view, change the
element's name to name.
c. Repeat
the previous step four times, changing the name of the element to: street,
city, state, and zip.
d. You
have now completed the element declarations for PurchaseOrderType. You will now
add an attribute declaration.
e. From
the PurchaseOrderType right-click
pop-up menu, click Add Attribute. This adds a new attribute called
NewAttribute.
f.
In the Design view, change its name to orderDate.
Change its type to Built-in simple type and select date as its
type.
g. Right-click
the complex type USAddress and click Add Attribute. In the Design
view, change its name to country. Change its type to Built-in simple type and
select NMTOKEN as its type. Click the Fixed radio button and type
the value
You will now fill in the details for the complex type Items.
a.
Right-click the complex type Items and click Add Content Model.
b. Right-click
the content model and click Add Element. In the Design view, change the
element's name to item. Click the User-defined complex type radio
button. Select **anonymous** from the type list. A new
anonymous complex type will be added to the item.
c. Expand
item. Right-click the anonymous complex type and click Add Content
Model.
d. Right-click
the content model and click Add Element. In the Design view, change the
element's name to productName.
e. Right-click
the content model and click Add Element. In the Design view, change the
element's name to quantity.
f.
In the Design for quantity, change the type to User-defined
simple type, and select **anonymous** from the type list. A new
anonymous simple type will be added to quantity.
g. Expand
quantity. Right-click the anonymous simple type and click Add
Restriction.
h. Expand
the anonymous simple type and select the restriction. In the Design view for
this restriction element, change its type to Built-in simple type and
select positiveInteger as its type. Change the value of the maxExclusive
field (in the Facets table) to 100.
i.
Right-click the content model and click Add Element.
In the Design view, change the element's name to USPrice. Change its type to Built-in
simple type and select decimal as its type.
j.
Right-click the content model and click Add Element
Ref. This will add a new element reference to a global element. Change the
element reference to the global element comment by selecting comment from
the Reference name list.
k. Right-click
the content model and click Add Element. In the Design view, change its
name to shipDate. Change its type to Built-in simple type and select date
as its type.
l.
Right-click the complex type Items and click Add
Attribute.
m. In
the Design view, change the attribute's name to partNum. Change its type
to the User-defined simple type and select SKU as its type.
Click the simple type SKU. You want to derive
its type from a built-in type and apply a constraint to its value.
a. Right-click
the simple type SKU, and click Add Restriction. This will add a
new restriction element.
b. Expand
SKU and select the restriction. In the Design view, change the base type
to Built-in simple type and select string.
c. Right-click
the restriction element and click Add Pattern. This will add a new
pattern. Change its value to \d{3}-[A-Z]{2} in the Design view.
You have now completed your PurchaseOrder schema.
Your XML schema outline should look something like Figure 1 below.

Figure 1 – PurchaseOrder Schema Outline
4. Saving your XML
schema
At any time, you can save the XML schema file. Click File
> Save PurchaseOrder.xsd to save it. If you decide to clean up the
sample, right-click MyXMLProject and select Delete from the
project's right-click pop-up menu.
5. Generating an XML file from an XML schema
You can generate an XML file from an XML schema file. To generate an XML file from a schema file follow these steps:
a.
In the Navigator view, right-click on the XML schema
file that you want to work with. From its pop-up menu, click Generate >
XML File.
b. Select
a project or folder to contain the XML file and type a name for it. The name of
the file must end in .xml. Click Next.
c. Click
the Root Element of the XML file. The root element of an XML file is the
element that contains all other elements in that file. All of the global
elements you have defined in the XML schema will be included in the Root
Element list. If you do not have any global elements in your XML schema, you cannot
create an XML file from it.
d. If
you select the Create optional attributes and/or Create optional elements check boxe(s), optional
information will be created on top of the minimum amount required to generate a
valid XML file.
e. The XML schema information section contains information about the target namespace of the XML schema, its prefix, and the schema location.
f.
Select the entry you want to edit and click Edit.
g. The
value in the Namespace Name field is the target namespace of the XML
schema. Your XML file should be associated with the same namespace as its XML
schema is associated with.
h. All
qualified elements and attributes in the XML file associated with the namespace
will be prefixed with the Prefix value.
i.
The Location Hint field contains the location of
the XML schema.
j.
Click Finish.
k. The
XML file appears in the Navigator view and automatically opens in the XML editor.
If you close the file, and want to re-open it later to edit it, right-click it
and click Open With > XML Editor.
l. Right-click on the XML file and select Run validation to verify that the document you have created is valid before you begin editing.
Figure 2 below illustrates the XML file generated using WSAD:
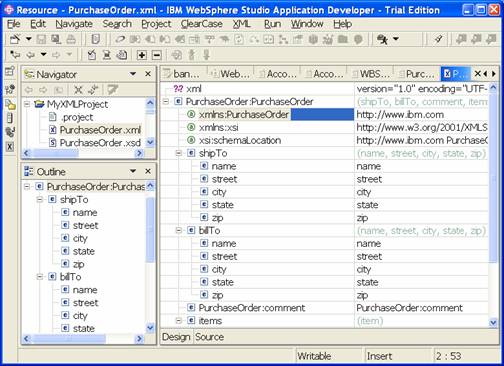
Figure 2 – Viewing an XML file generated using WSAD
The XML file will contain the selected root element and any elements or attributes contained in the root element. It also contains information about the XML file namespace and location. You can start with a generated XML file and add elements and attributes to it.
The generated XML file for the PurchaseOrder example is shown below:
<?xml version="1.0" encoding="UTF-8"?>
<PurchaseOrder:PurchaseOrder
xmlns:PurchaseOrder="http://www.ibm.com"
xmlns:xsi="http://www.w3.org/2001/XMLSchema-instance"
xsi:schemaLocation="http://www.ibm.com
PurchaseOrder.xsd ">
<shipTo>
<name>name</name>
<street>street</street>
<city>city</city>
<state>state</state>
<zip>zip</zip>
</shipTo>
<billTo>
<name>name</name>
<street>street</street>
<city>city</city>
<state>state</state>
<zip>zip</zip>
</billTo>
<PurchaseOrder:comment>PurchaseOrder:comment</PurchaseOrder:comment>
<items>
<item>
<productName>productName</productName>
<quantity>1</quantity>
<USPrice>0.0</USPrice>
<PurchaseOrder:comment>PurchaseOrder:comment</PurchaseOrder:comment>
<shipDate>2001-01-01</shipDate>
</item>
</items>
</PurchaseOrder:PurchaseOrder>
6. Generating an XML file based on an existing schema file
a. Using Windows Explorer, locate the WBStatusV1.1.xsd file located under %LQLabInstallPath%\Lab1\Part1\MyXMLProject\, right-click on the file and select Copy.
b. Right-click on MyXMLProject in WSAD’s Navigator and select Paste.
c. Follow the guidelines outlined in Step 5 above to generate an XML file based on WBStatusV1.1.xsd.
The generated XML file is shown below:
<?xml version="1.0" encoding="UTF-8"?>
<wbstatus:WBStatus xmlns:wbstatus="http://v1x1.wbstatus.wbxml.ts.net/" xmlns:xsi="http://www.w3.org/2001/XMLSchema-instance"
xsi:schemaLocation="http://v1x1.wbstatus.wbxml.ts.net/
../Test/Import/WBStatusV1.1.xsd
">
<wbstatus:code>
<wbstatus:value>wbstatus:value</wbstatus:value>
</wbstatus:code>
<wbstatus:type>System</wbstatus:type>
<wbstatus:reasonText>
wbstatus:reasonText
</wbstatus:reasonText>
</wbstatus:WBStatus>
Part Two: Producing XML with Java in WSAD
Java Developers rely on XML parsers to read XML files, and XML processors to transform XML into HTML or other markup languages. The same Java tools can be used to produce XML from scratch. For illustration purposes, consider a simple list of user records expressed in the XML file users.xml as shown below:
<?xml
version="1.0" encoding="ISO-8859-1"?>
<!DOCTYPE
USERS SYSTEM "users.dtd">
<USERS>
<USER ID="PWD122"
TYPE="customer">Tim@Home</USER>
<USER ID="MX787"
TYPE="manager">Jack&Moud</USER>
<USER ID="A4Q45"
TYPE="employee">John D'oé</USER>
</USERS>
Each user has an ID a TYPE and a NAME. The full definition of user records is available in the XML DTD users.dtd shown below:
<?xml
version="1.0" encoding="UTF-8"?>
<!—
DTD Sample -->
<!ELEMENT
USERS (USER*)>
<!ELEMENT
USER (#PCDATA)>
<!ATTLIST
USER
ID CDATA #REQUIRED
TYPE CDATA #REQUIRED>
The purpose of this part of the lab is to generate users.xml from input data using a Java program developed within WSAD.
1. Serialization to file output stream
As an XML novice developer, you may think of using serialization to file output stream as a quick coding mechanism to generate users.xml.
a. Create a Project (File > New > Project), pick Java in the left pane of the New Project Select dialog box, and type XML for your Project Name in the New Java Project dialog box.
b. Right-click on the XML Project in the Package Explorer view of the Java Perspective (Window > Open Perspective > Java), select New > Java Package, and enter test.xml as the name of the Java package.
c. Right-click on the Test1 project, select Import, pick File system and press Next.
d. Browse to %%LQLabInstallPath%\Lab1\Part2\XML, select XML as the resource to import, and click on Finish.
e. Expand the test.xml package, and double click on XMLClass.java to open the file in the Java Editor.
f. Scroll down to the badGeneration() method and review the code.
g.
Note that this code should be avoided as it does not
generate valid XML. The "Jack&Moud" username has to be
translated to "Jack&Moud" because of '&' being a special
character (called predefined entity). In addition to these specials characters,
the developer has to provide special handling for XML processing instructions
(i.e., <?xml-stylesheet type="text/xsl"
href="users.xsl"?>), entity references, comments and CDATA sections.
2. DOM + Xerces Serialization to file output stream
Java XML libraries (parsers
and/or processors) should be used to generate well-formed and valid XML. The
solution reviewed in this step creates a DOM document from scratch and
serialize it to XML.
a.
In the Java Editor window you just opened in Step 1,
scroll up to the generateWithDOM(String filename) method and review the code.
b. This solution works nice for complex XML structures and provides the ability to update XML documents. However the DOM approach is memory consuming and suffers a slower speed of initial data retrieval due to the fact that a DOM tree (Element, Node, Attributes ...) must be created in memory before it can be serialized.
3. SAX + Xerces Serialization to file output stream
When the advantages of DOM are not crucial, a memory-friendly solution consists of
serializing the XML file on the fly through SAX.
a. In the Java Editor window you opened in Step 1, scroll up to the generateWithSAX(String filename) method and review the code.
b. SAX is an event-based API. Basically, to read an XML file, you implement ContentHandler interface. startElement(), characters(...), endElement() methods are called when XML file is parsed. Xerces provides a reverse solution. The developer calls startElement(...), characters(...), endElement(...) SAX methods to generate the XML file.
c. The sample application uses the Xerces 2.6.2_library, but what about others libraries (e.g., Crimson, JDOM, Xalan2, JDK 1.4.2, etc.). This solution does not allow the programmatic selection of an XML parser and/or an XML processor that would make the Java code independent of specific libraries. A solution to this problem is to use JAXP as described in step 5.
4. Configure and run the XMLClass sample program
a. Right-click on the XML project in the Package Explorer, and select Properties.
b. Pick Java Build Path, and select the Libraries tab.
c. Click on Add Variable and select XMLPARSERAPIS and XERCES_IMPL_JAR then press OK.
d. Click OK when you are done adding libraries.
e. Click on the XML project and select Project > Rebuild Project, then select Run > Run… The Project text box should list XML and the Main class should be test.xml.XMLClass.
f. Click on the Arguments tab, and type in SAXfile DOMfile as the Program arguments. These are the names of the XML files that will be created respectively by the generateWithSAX and generateWithDOM methods.
g. Select the Local directory radio button and browse to the %LQLabInstallPath%\ directory and click on Run.
h. Verify that the SAXfile.xml and DOMfile.xml are properly created with the correct content.
5. JAXP + DOM/SAX + Serialization to servlet output stream (JDK 1.4.2 compliant)
JAXP 1.2 is an API developed by SUN. It allows to plug any XML parser and/or processor and "write once, run anywhere" your Java/XML code. Implementation of this API is available in JDK1.4.2 and WSAD 5.1.2.
a.
Select File >
Import and pick EAR file.
b. Browse to %LQLabInstallPath%\Lab1\Part2\XMLJ2EE\, pick the XMLJ2EE.ear archive, and click on Finish.
c. Select Window > Open Perspective > Web, and expand the XMLJ2EEWeb project in the Project Navigator.
d. Double-click on XMLServlet.java under Java Resources (under default package) to open the file in the Java Editor.
e. Review the code for the JAXPTransformWithDOM(PrintWriter out) and JAXPTransformWithSAX(PrintWriter out).
f. Right-click on index.html under Web Content and select Run on Server.
g. Select the WebSphere v5.1 Test Environment under User an existing server and click on Finish.
h.
Wait until http://locahost:9080/XMLJ2EEWeb/index.html
displays in the WSAD browser window, and click on either link to test the
functionality.
Solution: Producing XML Related Files
Part One: Creating an XML Schema and Generating an XML
File
Copies of all files for this part are available under %LQLabInstallPath%\Lab1\Part1\MyXMLProject
1. PurchaseOrder.xsd
<?xml
version="1.0" encoding="UTF-8"?>
<schema xmlns=http://www.w3.org/2001/XMLSchema targetNamespace=http://www.ibm.com
xmlns:po="http://www.ibm.com">
<annotation>
<documentation
xml:lang="en">Schema example</documentation>
</annotation>
<element name="purchaseOrder"
type="po:PurchaseOrderType"></element>
<element name="comment"
type="string"></element>
<complexType name="PurchaseOrderType">
<sequence>
<element name="shipTo"
type="po:USAddress"></element>
<element name="billTo"
type="po:USAddress"></element>
<element ref="po:comment"
minOccurs="0"></element>
<element name="items"
type="po:Items"></element>
</sequence>
<attribute name="orderDate"
type="date"></attribute>
</complexType>
<complexType name="USAddress">
<sequence>
<element name="name"
type="string"></element>
<element name="street"
type="string"></element>
<element name="city"
type="string"></element>
<element name="state" type="string"></element>
<element name="zip"
type="decimal"></element>
</sequence>
<attribute name="country" type="NMTOKEN"
fixed="US"></attribute>
</complexType>
<complexType name="Items">
<sequence>
<element name="item" minOccurs="0"
maxOccurs="unbounded">
<complexType>
<sequence>
<element name="productName"
type="string"></element>
<element name="quantity">
<simpleType>
<restriction
base="positiveInteger">
<maxExclusive
value="100"></maxExclusive>
</restriction>
</simpleType>
</element>
<element name="USPrice"
type="decimal"></element>
<element ref="po:comment"
minOccurs="0"></element>
<element name="shipDate"
type="date"
minOccurs="0"></element>
</sequence>
<attribute name="partNum"
type="po:SKU"
use="required"></attribute>
</complexType>
</element>
</sequence>
</complexType>
<simpleType
name="SKU">
<restriction base="string">
<pattern
value="\d{3}-[A-Z]{2}"></pattern>
</restriction>
</simpleType>
</schema>
2. PurchaseOrder.xml
<?xml
version="1.0" encoding="UTF-8"?>
<po:purchaseOrder
orderDate="2001-01-01" xmlns:po="http://www.ibm.com"
xmlns:xsi="http://www.w3.org/2001/XMLSchema-instance"
xsi:schemaLocation="http://www.ibm.com
PurchaseOrder.xsd">
<shipTo country="US">
<name>Alice Smith</name>
<street>
<city>
<state>CA</state>
<zip>90952</zip>
</shipTo>
<billTo country="US">
<name>Robert Smith</name>
<street>
<city>
<state>PA</state>
<zip>95819</zip>
</billTo>
<po:comment>Hurry, my lawn is going wild!</po:comment>
<items>
<item partNum="872-AA">
<productName>Lawnmower</productName>
<quantity>1</quantity>
<USPrice>148.95</USPrice>
<po:comment>Confirm this is
electric</po:comment>
</item>
<item partNum="926-AA">
<productName>Baby Monitor</productName>
<quantity>1</quantity>
<USPrice>39.98</USPrice>
<shipDate>2001-07-21</shipDate>
</item>
</items>
</po:purchaseOrder>
Part Two: Producing XML with Java in WSAD
Copies of all files for this part are available under %LQLabInstallPath%\Lab1\Part2
1. Serialization to file output stream
public void badGeneration()
{
try
{
String
ENCODING = "ISO-8859-1";
String[]
id = {"PWD122","MX787","A4Q45"};
String[]
type = {"customer","manager","employee"};
String[]
desc = {"Tim@Home","Jack&Moud","John D'oé"};
PrintWriter
out = new PrintWriter(new
FileOutputStream("users.xml"));
out.println("<?xml version=\"1.0\"
encoding=\""+ENCODING+"\"?>");
out.println("<!DOCTYPE USERS SYSTEM
\"users.dtd\">");
out.println("<USERS>");
for
(int
i=0;i<id.length;i++)
{
out.println("<USER ID=\""+id[i]+"\"
TYPE=\""+type[i]+"\">"+desc[i]+"</USER>");
}
out.println("</USERS>");
out.close();
}
catch (Exception
e)
{
e.printStackTrace();
}
}
2. DOM + Xerces Serialization to file output stream
public void generateWithDOM(String
filename)
{
try
{
Element
e = null;
Node
n = null;
// Document.
Document xmldoc=
new DocumentImpl();
// Root element.
Element
root = xmldoc.createElement("USERS");
String[]
id = {"PWD122","MX787","A4Q45"};
String[]
type = {"customer","manager","employee"};
String[]
desc = {"Tim@Home","Jack&Moud","John D'oé"};
for
(int
i=0;i<id.length;i++)
{
//
Child i.
e
= xmldoc.createElementNS(null, "USER");
e.setAttributeNS(null, "ID", id[i]);
e.setAttributeNS(null, "TYPE",
type[i]);
n
= xmldoc.createTextNode(desc[i]);
e.appendChild(n);
root.appendChild(e);
}
xmldoc.appendChild(root);
FileOutputStream
fos = new FileOutputStream(filename);
//
XERCES 1 or 2 additionnal classes.
OutputFormat
of = new OutputFormat("XML","ISO-8859-1",true);
of.setIndent(1);
of.setIndenting(true);
of.setDoctype(null,"users.dtd");
XMLSerializer
serializer = new XMLSerializer(fos,of);
//
As a DOM Serializer
serializer.asDOMSerializer();
serializer.serialize(
xmldoc.getDocumentElement() );
fos.close();
}
catch
(Exception e)
{
e.printStackTrace();
}
}
3. SAX + Xerces Serialization to file output stream
public void generateWithSAX(String
filename)
{
try
{
FileOutputStream
fos = new FileOutputStream(filename);
//
XERCES 1 or 2 additionnal classes.
OutputFormat
of = new OutputFormat("XML","ISO-8859-1",true);
of.setIndent(1);
of.setIndenting(true);
of.setDoctype(null,"users.dtd");
XMLSerializer
serializer = new XMLSerializer(fos,of);
//
SAX2.0 ContentHandler.
ContentHandler
hd = serializer.asContentHandler();
hd.startDocument();
//
Processing instruction sample.
//hd.processingInstruction("xml-stylesheet","type=\"text/xsl\"
href=\"users.xsl\"");
//
USER attributes.
AttributesImpl
atts = new AttributesImpl();
//
USERS tag.
hd.startElement("","","USERS",atts);
//
USER tags.
String[]
id = {"PWD122","MX787","A4Q45"};
String[]
type = {"customer","manager","employee"};
String[]
desc = {"Tim@Home","Jack&Moud","John D'oé"};
for
(int
i=0;i<id.length;i++)
{
atts.clear();
atts.addAttribute("","","ID","CDATA",id[i]);
atts.addAttribute("","","TYPE","CDATA",type[i]);
hd.startElement("","","USER",atts);
hd.characters(desc[i].toCharArray(),0,desc[i].length());
hd.endElement("","","USER");
}
hd.endElement("","","USERS");
hd.endDocument();
fos.close();
}
catch (SAXException
se)
{
se.printStackTrace();
}
catch
(IOException ioe)
{
ioe.printStackTrace();
}
}
4. JAXP + DOM/SAX + Serialization to servlet output stream
public void JAXPTransformWithDOM(PrintWriter
out)
{
//
Create XML DOM document (Memory consuming).
Document
xmldoc = null;
try
{
DocumentBuilderFactory
factory =
DocumentBuilderFactory.newInstance();
DocumentBuilder
builder = factory.newDocumentBuilder();
DOMImplementation
impl = builder.getDOMImplementation();
Element
e = null;
Node
n = null;
//
Document.
xmldoc
= impl.createDocument(null, "USERS",
null);
//
Root element.
Element
root = xmldoc.getDocumentElement();
String[]
id = {"PWD122","MX787","A4Q45"};
String[]
type = {"customer","manager","employee"};
String[]
desc = {"Tim@Home","Jack&Moud","John D'oé"};
for
(int
i=0;i<id.length;i++)
{
//
Child i.
e
= xmldoc.createElementNS(null, "USER");
e.setAttributeNS(null, "ID", id[i]);
e.setAttributeNS(null, "TYPE",
type[i]);
n = xmldoc.createTextNode(desc[i]);
e.appendChild(n);
root.appendChild(e);
}
}
catch (FactoryConfigurationError
e)
{
System.out.println("Could not locate a JAXP
DocumentBuilderFactory
class");
}
catch
(ParserConfigurationException e)
{
System.out.println("Could not locate a JAXP
DocumentBuilder
class");
}
//
DOM Transform.
try
{
DOMSource
domSource = new DOMSource(xmldoc);
StreamResult
streamResult =
new StreamResult(out);
TransformerFactory
tf = TransformerFactory.newInstance();
Transformer
serializer = tf.newTransformer();
serializer.setOutputProperty(OutputKeys.ENCODING,"ISO-8859-1");
serializer.setOutputProperty(OutputKeys.INDENT,"yes");
serializer.transform(domSource,
streamResult);
}
catch (Exception
e)
{
e.printStackTrace();
}
}
public void JAXPTransformWithSAX(PrintWriter
out)
{
try
{
StreamResult
streamResult =
new StreamResult(out);
SAXTransformerFactory
tf = (SAXTransformerFactory) SAXTransformerFactory.newInstance();
// SAX2.0 ContentHandler.
TransformerHandler hd = tf.newTransformerHandler();
Transformer serializer =
hd.getTransformer();
serializer.setOutputProperty(OutputKeys.ENCODING,"ISO-8859-1");
serializer.setOutputProperty(OutputKeys.INDENT,"yes");
hd.setResult(streamResult);
hd.startDocument();
AttributesImpl
atts = new AttributesImpl();
//
USERS tag.
hd.startElement("","","USERS",atts);
//
USER tags.
String[]
id = {"PWD122","MX787","A4Q45"};
String[]
type = {"customer","manager","employee"};
String[]
desc = {"Tim@Home","Jack&Moud","John D'oé"};
for
(int
i=0;i<id.length;i++)
{
atts.clear();
atts.addAttribute("","","ID","CDATA",id[i]);
atts.addAttribute("","","TYPE","CDATA",type[i]);
hd.startElement("","","USER",atts);
hd.characters(desc[i].toCharArray(),0,desc[i].length());
hd.endElement("","","USER");
}
hd.endElement("","","USERS");
hd.endDocument();
}
catch (Exception
e)
{
e.printStackTrace();
}
}
Next Steps:
Let’s examine what you have just accomplished:
- In the first part of this lab, you learned how to
create an XML schema using the WSAD XML schema editor and how to generate
an XML document from it. This will be useful as you define and experiment
with Schemas and related XML files.
- In the second part of the lab, you experimented with
various ways of producing XML documents using Java programs and the XML
APIs for Java. The same type of processing will need to be applied to
produce XML payload data as you start working with Web Services.
What’s next?
Now that you are
familiar with the production of XML data using WSAD, you are ready to
start looking at consuming XML as part of the next lab.