Introduction
In this lab, you will implement process memory isolation, virtual
memory, and a system call (fork()) in a tiny (but real!)
operating system, called WeensyOS.
This will introduce you to virtual memory and reinforce some of the concepts that we have covered this semester.
The WeensyOS kernel runs on x86-64 CPUs. Because the OS kernel runs on the “bare” hardware, debugging kernel code can be tough: if a bug causes misconfiguration of the hardware, the usual result is a crash of the entire kernel (and all the applications running on top of it). And because the kernel itself provides the most basic system services (for example, causing the display hardware to display error messages), deducing what led to a kernel crash can be particularly challenging. In the old days, the usual way to develop code for an OS (whether as part of a class, in a research lab, or in industry) was to boot it on a physical CPU. The lives of kernel developers have gotten much better since. You will run WeensyOS in QEMU.
QEMU is a software-based x86-64 emulator: it “looks” to WeensyOS just
like a physical x86-64 CPU with a particular hardware configuration.
However, if your WeensyOS code-in-progress wedges the (virtual)
hardware, QEMU itself and the whole OS that is running on the “real”
hardware (that is, the “real” Linux OS that QEMU is running on) survive
unscathed (“real” is in quotation marks for reasons that will be
unpacked in the next paragraph). So, for example, your last few
debugging printf()s before a kernel crash will still get
logged to disk (by QEMU running on Linux), and “rebooting” the kernel
you’re developing amounts to re-running the QEMU emulator
application.
What is the actual software/hardware stack here? The answer is different for students with x86-64 computers (for example, Windows machines and older Macs) and ARMs. All students are running a host OS (on your computer) on top of either x86-64 or ARM hardware (ARM being the architecture for so-called Apple silicon, namely M1 and M2 chips). Then, the Docker containerization environment runs on top of the host OS (as a process). That environment, loosely speaking, emulates either an x86 or an ARM CPU, and running on top of that emulated CPU is Ubuntu Linux, targeted to x86-64 or ARM. Running on top of Ubuntu is QEMU. QEMU presents an emulated x86-64 interface, and QEMU itself is either an x86-64 or ARM binary, again depending on the underlying hardware. Finally, WeensyOS is exclusively an x86-64 binary, and that of course runs on QEMU (though if you have some x86-64 hardware sitting around, you can try installing WeensyOS and running it “bare”). Taking that same progression, now top-down: if you have an ARM CPU, that means you are running the WeensyOS kernel’s x86-64 instructions in QEMU, a software-emulated x86-64 CPU that is an ARM binary, on top of Linux (targeted to ARM), running in the Docker containerization environment (also itself an ARM binary), on macOS, running on an ARM hardware CPU.
Heads up. As always, it’s important to start on time. In this case, on time means 3 weeks before the assignment is due, as you will almost certainly need all of the allotted time to complete the lab. Kernel development is less forgiving than developing user-level applications; tiny deviations in the configuration of hardware (such as the MMU) by the OS tend to bring the whole (emulated) machine to a halt.
To save yourself headaches later, read this lab writeup in its entirety before you begin.
Resources.
You may want to look at Chapter 9 of CS:APP3e (from which our x86-64 virtual memory handout is borrowed). The book is on reserve at the Courant library. Section 9.7 in particular describes the 64-bit virtual memory architecture of the x86-64 CPU. Figure 9.23 and Section 9.7.1 show and discuss the
PTE_P,PTE_W, andPTE_Ubits; these are flags in the x86-64 hardware’s page table entries that play a central role in this lab.You may find yourself during the lab wanting to understand particular assembly instructions. Here are two guides to x86-64 instructions, from Brown and CMU. The former is more digestible; the latter is more comprehensive. The supplied code also uses certain assembly instructions like
iret; see here for a reference.
Getting Started
You’ll be working in the Docker container as usual. We assume that you have set up the upstream as described in the lab setup. Then run the following on your local machine (Mac users can do this on their local machine or within the Docker container; Windows and CIMS users should do this from outside the container):
$ cd ~/cs202
$ git fetch upstream
$ git merge upstream/main
This lab’s files are located in the lab4
subdirectory.
If you have any “conflicts” from lab 3, resolve
them before continuing further. Run git push to save
your work back to your personal repository.
Another heads up. Given the complexity of this lab, and the possibility of breaking the functionality of the kernel if you code in some errors, make sure to commit and push your code often! It's very important that your commits have working versions of the code, so if something goes wrong, you can always go back to a previous commit and get back a working copy! At the very least, for this lab, you should be committing once per step (and probably more often), so you can go back to the last step if necessary.
Goal
You will implement complete and correct memory isolation for WeensyOS
processes. Then you'll implement full virtual memory, which will improve
utilization. You'll implement fork() (creating new
processes at runtime) and for extra credit, you’ll implement
exit() (destroying processes at runtime).
We’ve provided you with a lot of support code for this assignment;
the code you will need to write is in fact limited in extent. Our
complete solution (for all 5 stages) consists of well under 300 lines of
code beyond what we initially hand out to you. All the code you write
will go in kernel.c (except for part of step 6).
Testing, checking, and validation
For this assignment, your primary checking method will be to run your instance of Weensy OS and visually compare it to the images you see below in the assignment.
Studying these graphical memory maps carefully is the best way to determine whether your WeensyOS code for each stage is working correctly. Therefore, you will definitely want to make sure you understand how to read these maps before you start to code.
We supply some grading scripts, outlined at the end of the lab, but those will not be your principal source of feedback. For the most part, they indicate only whether a given step is passing or failing; look to the memory maps to understand why.
Initial state
Enter the Docker environment:
$ ./cs202-run-docker
cs202-user@172b6e333e91:~/cs202-labs$ cd lab4/
cs202-user@172b6e333e91:~/cs202-labs/lab4$ make run
The rest of these instructions presume that you are in the Docker
environment. We omit the
cs202-user@172b6e333e91:~/cs202-labs part of the
prompt.
make run should cause you to see something like the
below, which shows four processes running in parallel, each running a
version of the program in p-allocator:

This image loops forever; in an actual run, the bars will move to the right and stay there. Don't worry if your image has different numbers of K's or otherwise has different details.
If your bars run painfully slowly, edit the
p-allocator.c file and reduce the
ALLOC_SLOWDOWN constant.
Stop now to read and understand
p-allocator.c.
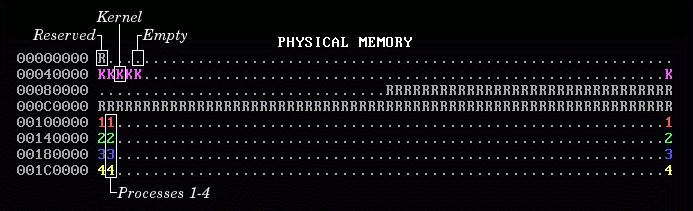
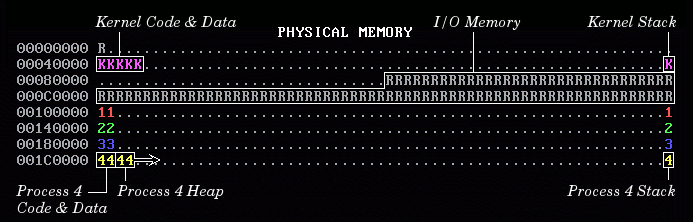
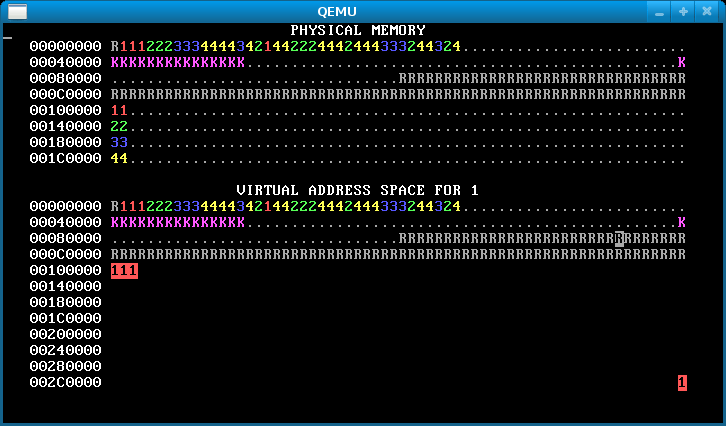
Here’s how to interpret the memory map display:
WeensyOS displays the current state of physical and virtual memory. Each character represents 4 KB of memory: a single page. There are 2 MB of physical memory in total. (Ask yourself: how many pages is this?)
WeensyOS runs four processes, 1 through 4. Each process is compiled from the same source code (
p-allocator.c), but linked to use a different region of memory.Each process asks the kernel for more heap memory, one page at a time, until it runs out of room. As usual, each process's heap begins just above its code and global data, and ends just below its stack. The processes allocate heap memory at different rates: compared to Process 1, Process 2 allocates twice as quickly, Process 3 goes three times faster, and Process 4 goes four times faster. (A random number generator is used, so the exact rates may vary.) The marching rows of numbers show how quickly the heap spaces for processes 1, 2, 3, and 4 are allocated.
Here are two labeled memory diagrams, showing what the characters mean and how memory is arranged.
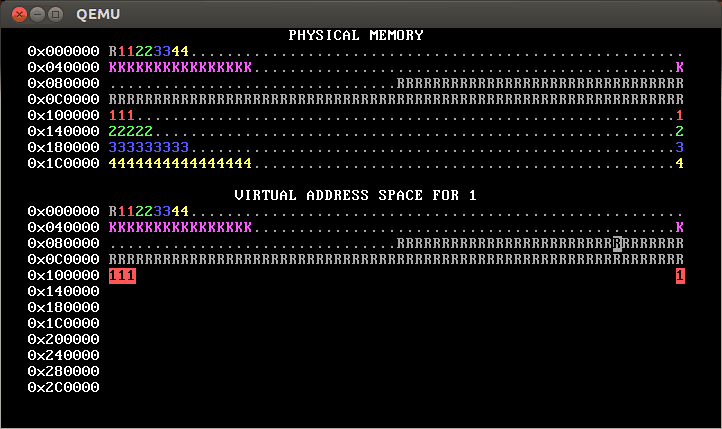
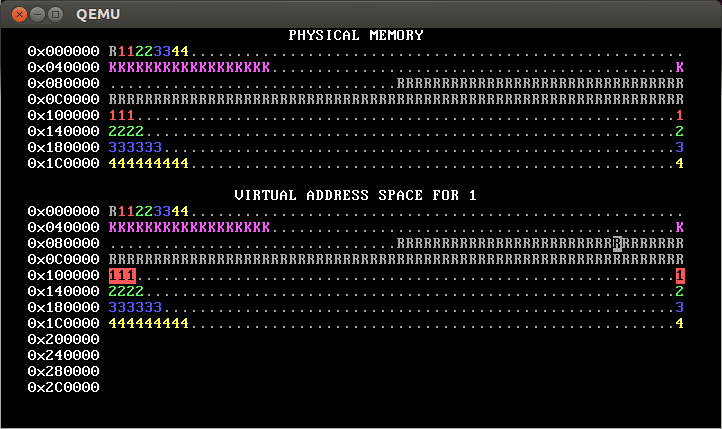
The virtual memory display is similar.
The virtual memory display cycles successively among the four processes’ address spaces. In the base version of the WeensyOS code we give you to start from, all four processes’ address spaces are the same (your job will be to change that!).
Blank spaces in the virtual memory display correspond to unmapped addresses. If a process (or the kernel) tries to access such an address, the processor will page fault.
The character shown at address X in the virtual memory display identifies the owner of the corresponding physical page.
In the virtual memory display, a character is reverse video if an application process is allowed to access the corresponding address. Initially, any process can modify all of physical memory, including the kernel. Memory is not properly isolated.
Running WeensyOS
Read the README-OS.md file for information on how to run
WeensyOS.
There are several ways to debug WeensyOS. We recommend adding
log_printf statements to your code. The output of
log_printf is written to the file /tmp/log.txt
outside QEMU, into your lab4 working directory. We
also recommend that you use assertions (of which we saw a few in lab 1)
to catch problems early. For example, call the helper functions we’ve
provided, check_page_table_mappings and
check_page_table_ownership to test a page table for obvious
errors.
Memory system layout
The WeensyOS memory system layout is defined by several constants:
| Constant | Meaning |
|---|---|
KERNEL_START_ADDR |
Start of kernel code. |
KERNEL_STACK_TOP |
Top of kernel stack. The kernel stack is one page long. |
console |
Address of CGA console memory. |
PROC_START_ADDR |
Start of application code. Applications should not be able to access
memory below this address, except for the single page at
console. |
MEMSIZE_PHYSICAL |
Size of physical memory in bytes. WeensyOS does not support physical
addresses ≥ this value. Defined as 0x200000 (2MB). |
MEMSIZE_VIRTUAL |
Size of virtual memory. WeensyOS does not support virtual addresses
≥ this value. Defined as 0x300000 (3MB). |
Writing expressions for addresses
WeensyOS uses several C macros to handle addresses. They are defined
at the top of x86-64.h. The most important include:
| Macro | Meaning |
|---|---|
PAGESIZE |
Size of a memory page. Equals 4096 (or, equivalently,
1 << 12). |
PAGENUMBER(addr) |
Page number for the page containing addr. Expands to an
expression analogous to addr / PAGESIZE. |
PAGEADDRESS(pn) |
The initial address (zeroth byte) in page number pn.
Expands to an expression analogous to pn * PAGESIZE. |
PAGEINDEX(addr, level) |
The index in the levelth page table for
addr. level must be between 0 and 3; 0 returns
the level-1 page table index (address bits 39–47), 1 returns the level-2
index (bits 30–38), 2 returns the level-3 index (bits 21–29), and 3
returns the level-4 index (bits 12–20). |
PTE_ADDR(pe) |
The physical address contained in page table entry pe.
Obtained by masking off the flag bits (setting the low-order 12 bits to
zero). |
Before you begin coding, you should both understand what these macros represent and be able to derive values for them if you were given a different page size.
Kernel and process address spaces
The version of WeensyOS you receive at the start of lab4 places the
kernel and all processes in a single, shared address space. This address
space is defined by the kernel_pagetable page table.
kernel_pagetable is initialized to the identity
mapping: virtual address X maps to physical address X.
As you work through the lab, you will shift processes to using their own independent address spaces, where each process can access only a subset of physical memory.
The kernel, though, must remain able to access any location
in physical memory. Therefore, all kernel functions run using the
kernel_pagetable page table. Thus, in kernel functions,
each virtual address maps to the physical address with the same number.
The exception() function explicitly installs
kernel_pagetable when it begins.
WeensyOS system calls are more expensive than they need to be, since
every system call switches address spaces twice (once to
kernel_pagetable and once back to the process’s page
table). Real-world operating systems avoid this overhead. To do so,
real-world kernels access memory using process page tables,
rather than a kernel-specific kernel_pagetable. This makes
a kernel’s code more complicated, since kernels can’t always access all
of physical memory directly under that design.
Step 1: Kernel isolation
In the starting code we’ve given you, WeensyOS processes could stomp
all over the kernel’s memory if they wanted to. Better prevent that.
Change kernel(), the kernel initialization function, so
that kernel memory is inaccessible to applications, except for the
memory holding the CGA console (the single page at
(uintptr_t) console == 0xB8000).1
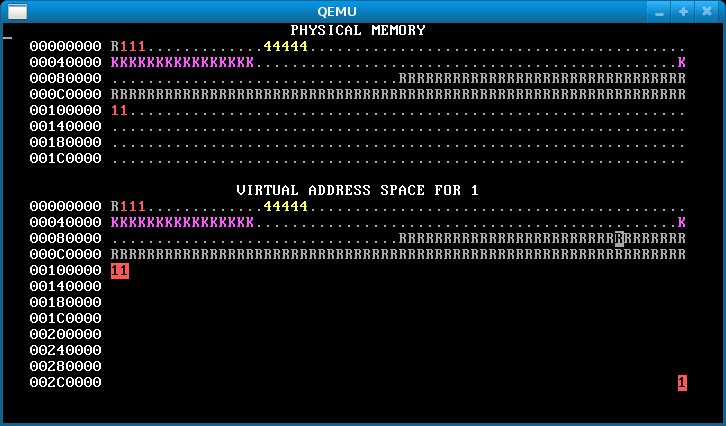
When you are done, WeensyOS should look like the below. In the virtual map, kernel memory is no longer reverse-video, since the user can’t access it. Note the lonely CGA console memory block in reverse video in the virtual address space.

Hints:
Use
virtual_memory_map. A description of this function is inkernel.h. You will benefit from reading all the function descriptions inkernel.h. You can supplyNULLfor theallocatorargument for now.If you really want to look at the code for
virtual_memory_map, it is ink-hardware.c, along with many other hardware-related functions.The
permargument tovirtual_memory_mapis a bitwise-or of zero or morePTEflags,PTE_P,PTE_W, andPTE_U.PTE_Pmarks Present pages (pages that are mapped).PTE_Wmarks Writable pages.PTE_Umarks User-accessible pages—pages accessible to applications. You want kernel memory to be mapped with permissionsPTE_P|PTE_W, which will prevent applications from reading or writing the memory, while allowing the kernel to both read and write.Make sure that your
sys_page_allocsystem call preserves kernel isolation: Applications shouldn’t be able to usesys_page_allocto screw up the kernel.
When you're done with this step, make sure to commit and push your code!
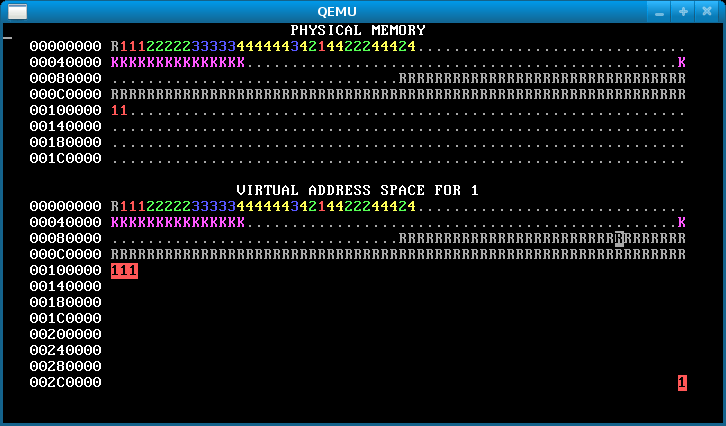
Step 2: Isolated address spaces
Implement process isolation by giving each process its own independent page table. Your OS memory map should look something like this when you’re done:
(Yours won’t look exactly like that; in the first line of physical
and virtual memory, instead of having the pattern
R11223344, yours will probably have a pattern like
R1111222233334444. This is because the gif is from a 32-bit
architecture; recall that on a 64-bit architecture, there are
four levels of page table required.)
That is, each process only has permission to access its own pages. You can tell this because only its own pages are shown in reverse video.
What goes in per-process page tables:
The initial mappings for addresses less than
PROC_START_ADDRshould be copied from those inkernel_pagetable. You can use a loop withvirtual_memory_lookupandvirtual_memory_mapto copy them. Alternately, you can copy the mappings from the kernel’s page table into the new page tables; this is faster, but make sure you copy the right data!The initial mappings for the user area—addresses greater than or equal to
PROC_START_ADDR—should be inaccessible to user processes (that is,PTE_Ushould not be set for these PTEs). In our solution (shown above), these addresses are totally inaccessible (so they show as blank), but you can also change this so that the mappings are still there, but accessible only to the kernel, as in this diagram:
The reverse video shows that this OS also implements process isolation correctly.
[Note: This second approach will pass the automated tests for step 2 but not for steps 3 and beyond. Thus, we recommend taking the first approach, namely total inaccessibility.]
How to implement per-process page tables:
Change
process_setupto create per-process page tables.We suggest you write a
copy_pagetable(x86_64_pagetable* pagetable, int8_t owner)function that allocates and returns a new page table, initialized as a full copy ofpagetable(including all mappings frompagetable). This function will be useful in Step 5. Inprocess_setupyou can modify the page table returned bycopy_pagetableaccording to the requirements above. Your function can usepageinfoto find free pages to use for page tables. Read aboutpageinfoat the top ofkernel.c.Remember that the x86-64 architecture uses four-level page tables.
The easiest way to copy page tables involves an allocator function suitable for passing to
virtual_memory_map.You’ll need at least to allocate a level-1 page table and initialize it to zero. You can also set up the whole four-level page table skeleton (for addresses
0…MEMSIZE_VIRTUAL - 1) yourself; then you don’t need an allocator function.A physical page is free if
pageinfo[PAGENUMBER].refcount == 0. Look at the other code inkernel.cfor some hints on how to examine thepageinfo[]array.All of process
P’s page table pages must havepageinfo[...].owner == Por WeensyOS’s consistency-checking functions will fail. This will affect your allocator function. (Hint: Don’t forget that global variables are allowed in your code!)
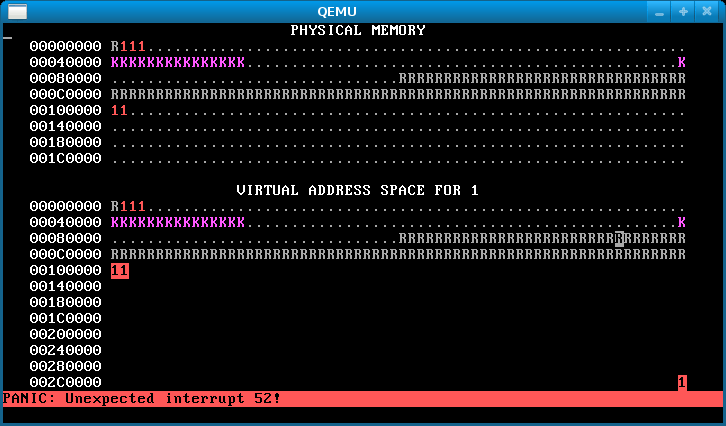
If you create an incorrect page table, WeensyOS might crazily reboot.
Don’t panic! Add log_printf statements. Another useful
technique that may at first seem counterintuitive: add infinite
loops to your kernel to track down exactly where a fault
occurs. (If the OS hangs without crashing once you’ve added an infinite
loop, then the crash you’re debugging must occur after the infinite
loop.)
Again, once finished with step 2, commit and push!
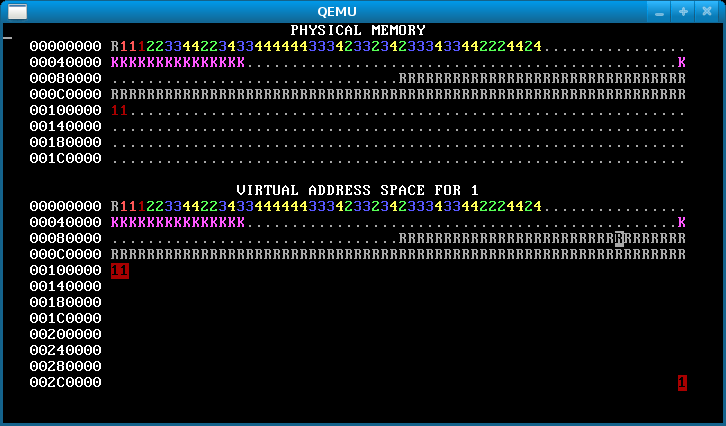
Step 3: Virtual page allocation
Up to this point in the lab, WeensyOS processes have used
physical page allocation: the page with physical
address X is used to satisfy the sys_page_alloc(X)
allocation request for virtual address X. This strategy is
inflexible and limits utilization. Change the implementation of the
INT_SYS_PAGE_ALLOC system call so that it can use any
free physical page to satisfy a sys_page_alloc(X)
request.
Your new INT_SYS_PAGE_ALLOC code must perform the
following tasks.
Find a free physical page using the
pageinfo[]array. Return-1to the application if you can’t find one. Use any algorithm you like to find a free physical page; our solution just returns the first one we find.Record the physical page’s allocation in
pageinfo[].Map that physical page at the requested virtual address.
Don’t modify the assign_physical_page helper function,
which is also used by the program loader. You can write a new function
if you need to.
Here’s how our OS looks after this step.

Now commit and push your code before moving on to step 4!
Step 4: Overlapping address spaces
Now the processes are isolated, which is awesome. But they’re still not taking full advantage of virtual memory. Isolated address spaces can use the same virtual addresses for different physical memory. There’s no need to keep the four process address spaces disjoint.
In this step, change each process’s stack to start from address
0x300000 == MEMSIZE_VIRTUAL. Now the processes have enough
heap room to use up all of physical memory! Here’s how the memory map
will look after you’ve done it successfully:
Notice the single reverse video page in the bottom right, for all processes. This is their stack page: each process has the same virtual address for its stack page, but (if you’ve implemented it correctly) different physical pages.
If there’s no physical memory available, sys_page_alloc
should return an error to the caller (by returning -1). Our solution
additionally prints “Out of physical memory!” to the
console when this happens; you don’t need to.
As always, make sure to commit and push after finishing this step!
Step 5: Fork
The fork() system call is one of Unix’s great ideas. It
starts a new process as a copy of an existing one. The
fork() system call appears to return twice, once to each
process. To the child process, it returns 0. To the parent process, it
returns the child’s process ID.
Run WeensyOS with make run or
make run-console. At any time, press the ‘f’
key. This will soft-reboot WeensyOS and ask it to run a single process
from the p-fork application, rather than the gang of
allocator processes. You should see something like this in
the memory map:
That’s because you haven’t implemented fork() yet.
How to implement fork():
When a process calls
fork(), look for a free process slot in theprocesses[]array. Don’t use slot 0. If no free slot exists, return-1to the caller.If a free slot is found, make a copy of
current->p_pagetable, the forking process’s page table, using your function from earlier.But you must also copy the process data in every application page shared by the two processes. The processes should not share any writable memory except the console (otherwise they wouldn’t be isolated). So
fork()must examine every virtual address in the old page table. Whenever the parent process has an application-writable page at virtual addressV, thenfork()must allocate a new physical pageP; copy the data from the parent’s page intoP, usingmemcpy(); and finally map pagePat addressVin the child process’s page table. (memcpy()works like the one installed on your Linux dev box; use the man pages for reference.)The child process’s registers are initialized as a copy of the parent process’s registers, except for
reg_rax.Use
virtual_memory_lookupto query the mapping between virtual and physical addresses in a page table.
When you’re done, you should see something like the below after
pressing ‘f’.
An image like the below, however, means that you forgot to copy the data for some pages, so the processes are actually sharing stack and/or data pages when they should not:
Other hints.
Make sure you’re setting the owner correctly when allocating new page tables.
Failing this step of the lab does not mean that the bug is actually in this step. It’s very common that a student’s step 5 code fails because of errors made in any of the earlier steps.
Don't forget to commit and push after finishing fork!
(Extra credit) Step 6: Shared read-only memory
This extra credit and the next are challenging—and the point values will not be commensurate to the extra effort. We supply these for completeness, and for those who want to go deeper into the material.
It’s wasteful for fork() to copy all of a
process’s memory. For example, most processes, including
p-fork, never change their code. So what if we shared the
memory containing the code? That’d be fine for process isolation, as
long as neither process could write the code.
Step A: change the process loader in k-loader.c to
detect read-only program segments and map them as read-only for
applications (PTE_P|PTE_U). A program segment
ph is read-only iff
(ph->p_flags & ELF_PFLAG_WRITE) == 0.
Step B: From step 5, your fork() code already shouldn’t
copy shareable pages. But make sure in this step that your code keeps
track accurately of the number of active references to each user page.
Specifically, if pageinfo[pn].refcount > 0 and
pageinfo[pn].owner > 0, then
pageinfo[pn].refcount should equal the number of times
pn is mapped in process page tables.
When you’re done, running p-fork should look like
this:

Hint:
- Mark a program segment read-only after the
memcpyandmemsetoperations that add data to the segment. Otherwise you’ll get a fault.
Again, commit and push!
(Extra credit) Step 7: Freeing memory
So far none of your test programs have ever freed memory or exited.
Memory allocation’s pretty easy until you add free! So let’s do that, by
allowing applications to exit. In this exercise you’ll implement the
sys_exit() system call, which exits the current
process.
This exercise is challenging: freeing memory will tend to expose weaknesses and problems in your other code.
To test your work, use make run and then type
‘e’. This reboots WeensyOS to run the
p-forkexit program. (Initially it’ll crash because
sys_exit() isn’t implemented yet.) p-forkexit
combines two types of behavior:
- Process 1 forks children indefinitely.
- The child processes, #2 and up, are memory allocators, as in the previous parts of the lab. But with small probability at each step, each child process either exits or attempts to fork a new child.
The result is that once your code is correct, p-forkexit
makes crazy patterns forever. An example:
Your picture might look a little different; for example, thanks to Step 6, your processes should share a code page, which would appear as a darker-colored “1”.
Here’s your task.
sys_exit()should mark a process as free and free all of its memory. This includes the process’s code, data, heap, and stack pages, as well as the pages used for its paging structures.- In
p-forkexit, unlike in previous parts of the lab,sys_fork()can run when there isn’t quite enough memory to create a new process. Your code should handle this case. If there isn’t enough free memory to allocate a process,fork()should clean up after itself (i.e., free any memory that was allocated for the new process before memory ran out), and then return-1to the caller. There should be no memory leaks.
The check_virtual_memory function, which runs
periodically, should help catch some errors. Feel free to add checks of
your own.
Further study (extra-extra credit)
If you are finished and can't wait to do more of this type of work, try the following. These will receive only token points, and are for you to explore, if you’re interested:
- Copy-on-write page allocation!
- Faster system calls, for instance using the
syscallandsysexitinstructions!
Running the grading tests
As stated at the start of this lab, the visual memory map displayed by QEMU as your WeensyOS kernel runs is the best way to determine how your code is behaving.
However, we provide automated tests, to help us grade, and for you to confirm that you’ve completed a step. The tests are not dispositive: there will be cases where your code passes the tests but is not ultimately correct (and will lose points on manual inspection during grading). We have not seen the reverse, however: cases where your code fails the tests but is correct. Thus, if the tests are failing, you almost certainly have a bug.
The bottom line: run with make run or
make run-console to visualize how memory is being used
while you are coding and validating your design. Then, switch to the
automated tests described below when you think you’ve completed a step
and want to double-check.
There are five tests, one for each step. You can run each of them
with the shell commands make grade-one through
grade-five. Note that the step numbers are written out in
text and not using digits. Each step’s result is all-or-nothing.
There are three invariants in all five steps’ tests that your code must satisfy. These invariants are:
The CGA console must be accessible by all processes (this requirement is discussed in the text above on step 1).
If we consider process P, there should be no virtual page in P’s page table at a user-space address (that is, whose address is above the kernel/user virtual address split point) that is owned by P but not accessible by P.
When we run our tests, we configure the WeensyOS kernel to exit after 10 seconds of execution (1000 WeensyOS kernel “ticks”).2 If a bug in your code makes the kernel crash before 1000 WeensyOS kernel ticks, you’ll fail the test on which that happens. Alternatively, if your kernel enters an infinite loop, and thus never reaches our exit at 1000 ticks, the VM will get stuck in the infinite loop and never exit, so the tests will hang and you’ll need to terminate your hung kernel. Do so by opening another terminal window and issuing the command
make kill, which will kill all QEMU processes you have running.
These invariants are reasonable: regardless of what your memory map display looks like, a good solution should neither crash nor enter an infinite loop.
Our tests are cumulative: each step’s test runs all prior steps’ tests. If any of the prior steps’ tests fail, the “current” step’s test is deemed to have failed. As a consequence, if you have a regression bug—for example, code in a current step re-introduces a bug in an earlier step—you can lose points not only for the current step you are working on, but also for prior steps. If you need to submit and find this has happened, don’t despair: simply revert your code to the last good version before your regression (using the history provided by GitHub—so, once again, make sure you commit and push often!).
Miscellaneous tips
The kernel defines a constant, HZ, which determines how
many times per second the kernel’s clock ticks. Don’t change this
value—there is absolutely no need to do so while solving the lab, and
doing so will likely cause your code to fail our tests!
After you run any of our per-stage make grade-N tests,
if you happen to examine the /tmp/log.txt file, you’ll see
a vast amount of output therein that we generate for use in the
automated tests. You can ignore it (and it will be absent when you run
with make run while you are developing, so it won’t clutter
your own debugging logprintf()s in those runs).
Submission
Handing in consists of three steps:
Executing this checklist:
- Make sure your code builds, with no compiler warnings.
- Make sure you’ve used
git addto add any files that you’ve created. - Fill out the top of the
answers.txtfile, including your name and NYU Id - Make sure you’ve answered every question in
answers.txt - Make sure you have answered all code exercises in the files.
- Create a file called
slack.txtnoting how many slack days you have used for this assignment. (This is to help us agree on the number that you have used.) Include this file even if you didn’t use any slack days. git addand commit the slack.txt file
Push your code to GitHub, so we have it (from outside the container or, if on Mac, this will also work from within the container):
$ cd ~/cs202/lab4
$ make clean
$ git commit -am "hand in lab4"
$ git push origin

Counting objects: ...
....
To  git@github.com:nyu-cs202/labs-23sp-<YourGithubUsername>.git
  7337116..ceed758  main -> main
Actually submit, by timestamping and identifying your pushed code:
- Decide which git commit you want us to grade, and copy its id (you
will paste it in the next sub-step). A commit id
is a 40-character hexadecimal string. Usually the commit id that you
want will be the one that you created last. The easiest way to obtain
the commit id for the last commit is by running the command
git log -1 --format=oneline. This prints both the commit id and the initial line of the commit message. If you want to submit a previous commit, there are multiple ways to get the commit id for an earlier commit. One way is to use the toolgitk. Another isgit log -p, as explained here, orgit show. - Now go to NYU Brightspace; there will be an entry for this lab. Paste only the commit id that you just copied.
- You can submit as many times as you want; we will grade the last commit id submitted to Brightspace.
- Decide which git commit you want us to grade, and copy its id (you
will paste it in the next sub-step). A commit id
is a 40-character hexadecimal string. Usually the commit id that you
want will be the one that you created last. The easiest way to obtain
the commit id for the last commit is by running the command
NOTE: Ground truth is what and when you
submitted to Brightspace. Thus, a non-existent commit id in Brightspace
means that you have not submitted the lab, regardless
of what you have pushed to GitHub. And, the time of your submission for
the purposes of tracking lateness is the time when you upload the id to
Brightspace, not the time when you executed
git commit.
This completes the lab.
Acknowledgments
This lab is due to Eddie Kohler, with modifications and some infrastructure due to Brad Karp and Nikola Gvozdiev.