SVG
SVG Graphic Coding
SVG is a language for describing two-dimensional graphics in XML written in plain text. SVG allows for three types of graphic objects: vector graphic shapes (e.g., paths consisting of straight lines and curves), images and text. SVG uses a "painters model" of rendering. Paint is applied in successive operations such that each operation paints over some area. Elements in an SVG document fragment have an implicit drawing order, with the first elements in the SVG document fragment getting "painted" first. Subsequent elements are painted on top of previously painted elements. Shapes and text can be filled (i.e., apply paint to the interior of the shape) and stroked (i.e., apply paint along the outline of the shape). A stroke operation is centered on the outline of the object; thus, in effect, half of the paint falls on the interior of the shape and half of the paint falls outside of the shape.
Coordinate System

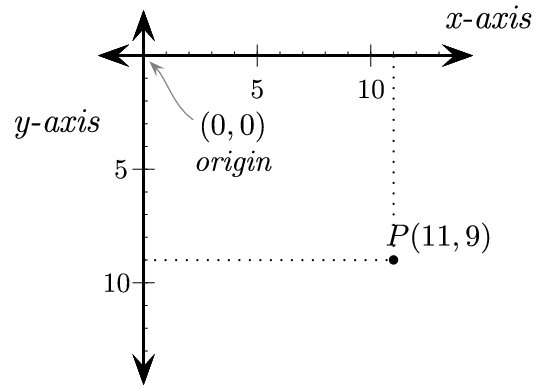
The coordinates of SVG graphics are “flipped” from the Cartesian coordinates you were introduced to in math class. Thus, the (0,0) coordinate is in the upper-left corner, and the y-axis ascends in a positive direction by going “down”. The x-axis goes from left to right as you are used to.
The Template
Use this as the surrounding code for any of your SVG graphics:
<?xml version="1.0" encoding="UTF-8"?>
<!DOCTYPE svg PUBLIC "-//W3C//DTD SVG 1.1//EN" "http://www.w3.org/Graphics/SVG/1.1/DTD/svg11.dtd">
<svg version="1.1" xmlns="http://www.w3.org/2000/svg"
       xmlns:xlink="http://www.w3.org/1999/xlink" width="360" height="300"
       xml:space="preserve">

     ---- code goes here ----
</svg>
In general, the viewBox tag should have the dimensions of your graphic from (0,0) to the max size. In this example it is (500, 600.
SHAPES
There are many built-in shapes in SVG.
Rectangle
<rect x="4" y="4" width="150" height="100" fill="red" stroke="black" stroke-width="4" />
Describes a rectangle. This indicates:
- rect - the rectangle is declared using a rect element.
- x, y - the co-ordinates of the top left corner of the rectangle.
- width, height - the width and height of the shape.
- fill - the color to use for the interior of the shape.
- stroke - the color for the line actually drawn for the rectangle.
- stroke-width - the thickness of the external stroke used to draw the rectangle.
So, the entire code necessary to create this single rectangle is:
<?xml version="1.0" encoding="UTF-8"?>
<!DOCTYPE svg PUBLIC "-//W3C//DTD SVG 1.1//EN" "http://www.w3.org/Graphics/SVG/1.1/DTD/svg11.dtd">
<svg version="1.1" xmlns="http://www.w3.org/2000/svg"
       xmlns:xlink="http://www.w3.org/1999/xlink" width="360" height="300"
       xml:space="preserve">

    <rect x="4" y="4" width="150" height="100" fill="red" stroke="black" stroke-width="4" />

</svg>
You can then either 1) Save the file as mysquare.svg or 2) save the files as mysquare.txt and change the name externally to mysquare.svg
CIRCLE
<circle fill="#F6EC13" stroke="#35459C" stroke-width="2" cx="55" cy="55" r="50"/>
This is what each part of that line does:
- circle - the shape
- cx, cy - the co-ordinates of the center of the circle.
- r - the circle radius.
- fill - the color to use for the interior of the shape.
- stroke - the color of the circle outline.
- stroke-width - the thickness of the stroke.
Shapes are displayed in the order they are described. Thus, the complete code for placing our circle on top of the previous square would be:
       <?xml version="1.0" encoding="UTF-8"?>
          <!DOCTYPE svg PUBLIC "-//W3C//DTD SVG 1.1//EN" "http://www.w3.org/Graphics/SVG/1.1/DTD/svg11.dtd">
          <svg version="1.1" xmlns="http://www.w3.org/2000/svg"
          xmlns:xlink="http://www.w3.org/1999/xlink" width="200" height="200"
          xml:space="preserve">

            <circle fill="#F6EC13" stroke="#35459C" stroke-width="2" cx="55" cy="55" r="50"/>
                  </svg>
Line
<line x1="10" y1="10" x2="100" y2="100" stroke-width="4" stroke="#0088ff"/>
- The line begins at the point set by the x1 and y1 attributes.
- The line ends at the point set by the x2 and y2 attributes.
- stroke-width defines the width of the strok
- stroke defines the color
Polygon
<polygon points="10,10 60,10 35,60" stroke="#660066" fill="#cc3333"/>
- The points attribute defines the x and y coordinates for each corner of the polygon
Text
<text x="10"  y="60"
          style="font-family: Helvetica;
                 font-size  : 32;
                 stroke     : #000000;
                 fill       : #00ff00;  ">
          I Love SVG!</text>
- There are several ways to style the text, but grouping all the CSS styles together is an easy approach.