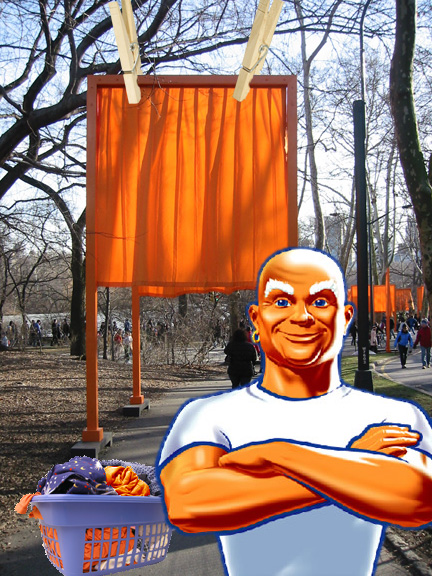
 1) There are
five images in the final document: A picture that this writer took in Central
Park, three stock photos images (which would be easy enough to photograph
oneself), and a picture of Mr. Clean taken from www.mrclean.com. (A note on
copyright: Since this is a parody, using a copyright image is probably permissible.)
1) There are
five images in the final document: A picture that this writer took in Central
Park, three stock photos images (which would be easy enough to photograph
oneself), and a picture of Mr. Clean taken from www.mrclean.com. (A note on
copyright: Since this is a parody, using a copyright image is probably permissible.)2) I was lucky because my photograph did not need cropping. If yours does, select the rectangular area you wish, and IMAGE:CROP. You might also do some quick color-balancing. The easiest tool for that is IMAGE:ADJUSTMENT:AUTO LEVELS.
3) I suggest to you strongly that you photograph yourself and/or your small objects against a sold colored background. You will have to select your image, and it is far easier to do so if you are standing against a contrasting background - blue and green are good colors (Think of the weatherman on TV!).
4) Having placed the Central Park Gates photo on the background layer, I worked with the two stock photos separately. I first selected the Clothes Pin that I wanted, copied it, and pasted it into a new file by itself. This allowed me to select the background color using the Magic Wand tool, and press DELETE. Thus, the background became transparent. Since I wanted more of the border reduced, I clicked the Magic Wand on the transparent background to select it, and then chose SELECT:MODIFY:EXPAND by 1 or two pixels. I hit DELETE again. Finally, I again used the SELECT:MODIFY:EXPAND command to select another pixel or two of the picture, but this time blurred the edge using FILTER:BLUR:GAUSSIAN BLUE. This softens the edge and gets rid of some of the 'jaggies'.
5) The Clothes Pins had to be rotated into position using: IMAGE: ROTATE CANVAS. I then re-sized them by choosing IMAGE: IMAGE SIZE. On the same menu, I made them 72 dpi since we are going to post the picture to the web. Finally, I copied the Clothes Pin, and on the Central Park photo document, chose LAYER: NEW LAYER before I pasted it on. I positioned each of the Clothes Pins, and erased the back parts by using the LASSO tool and pressing DELETE.
6) The Clothes Basket was done similarly, but I wanted to change some of the clothes to a saffron color. I did this selecting the clothes I wanted by repetitively pressing the Magic Wand. (You can choose several areas at once by holding down the SHIFT key). I selected those areas that didn't want to cooperate by switching to the LASSO. Having selected the areas I wanted, I then chose IMAGE:ADJUSTMENT:COLOR BALANCE and moved the controls until I approximated saffron. (Note that you may want to adjust not only the Midtones, but the Highlights and Shadows as well!) The Clothes Basket was resized, and pasted into the final document on its own layer.
7) The picture of Mr. Clean posed a bit of a problem for several reasons. First, the background he was posed against was fairly busy, so it took some creative use of the Magic Wand to delete it. (Sometimes, if a person has wispy hair, it is almost impossible to separate them from the background. That is why it is best to have a green or blue background. There is also a FILTER:EXTRACT tool you can try, but it is not always successful either.) Having extracted his image, I realized that the light source was coming from the left, rather than from the right. So, I chose IMAGE: ROTATE CANVAS: FLIP HORIZONTAL. (Hopefully, no one will notice his ear ring is on the wrong side!)
8) Since Mr. Clean is much smaller than the other pictures, I saved a copy of the Composite picture (just for safety's sake!), and then reduced it in size. I then chose a new layer and pasted the Mr. Clean picture in the foreground.
9) Finally, I saved the result, and chose FILE: SAVE FOR WEB and chose a JPEG at high quality. Voila! There is the final picture.